Showing posts with label WOW Embossing Powders. Show all posts

Wednesday, March 13, 2013

She's All That for WOW Embossing Powders

Hello, WOW fans! Today, I have a cute birthday card for you that I made for the WOW Embossing Powder Blog. It can be used for either a male or female birthday, which in my book, is always a good thing. The image I used is called "All That" by Kenny K and she can be purchased in Kenny's online store. The WOW Embossing Powders  I used were Cable Car Red from the Suzy West By The Bay Collection and Earthtone Blueberry from the Suzy West Pantry Collection. I also created the sentiment with a stamp from WOW's stamp set called "Everyday Sentiments". All of these items are available for purchase through many local scrapbooking stores as well as online. Amazon has them for a great price right now.


You can see the Cable Car Red powder around the outer edges of the yellow patterned paper as well as on the checked pattern on the banner. I used the Blueberry powder on the sentiment and outlined it with white gel pen to make it look hand painted (sort of graffiti-like) and also to make it show up better.


I didn't know if I would love the primary color palette but after I put it all together, I really did like it. Most of you who follow me know that I do love bright colors but I normally steer clear of the primaries with very few exceptions. I may have to rethink that approach now! LOL 


I haven't finished the inside of it yet as I was up against a deadline that I didn't want to miss.


I am entering this card in the following challenges:

613 Avenue Create - Anything Goes (with optional sketch)


Crafting When We Can - #39 Earth, Air, Fire & Water (the colors in my card represent fire- those colors present in flames)

I hope you enjoyed my little WOW project and that you'll stop by the WOW Blog and leave a comment if you have a few minutes. Thanks for visiting me today. I'll be back soon with another new project. Until then...

Happy crafting!
Anniebee

Thursday, February 21, 2013

Wow Embossing Powders DT Card

Hi, everyone! Another week is almost gone and this week, I'm really ready for the weekend to get here. I started a new position and it requires that I be there early so I have been leaving home around 6:30 to make sure I'm there early. I have gotten up at 5 the last two mornings and it's kicking my behind because I am not a morning person at ALL! That makes it a little tough to sit through 8 hours of training but so far, I'm managing okay.

I posted this card on the WOW Embossing Powders blog a couple of days ago but have been so busy, I'm just now getting around to posting it here. I'm a little tired tonight so I'm not going to dilly dally. Here's the card and the information I posted on the WOW blog:

Hello, WOW fans! Anne here with a greeting card I made using my favorite of all the WOW Embossing Powders, Metallic Gold Rich Pale Regular. As my focal point, I used a lovely digi stamp created by Rick St. Dennis. Being completely enamored of turn-of-the-century fashion, I knew I had to color this image the moment I saw it. You know how some images or colors or designs just speak to you? Well, this was one of those things for me. If there is anything I love as much as heat embossing on my projects, it's coloring with alcohol inks.

Anyway, I'd like to share this little card with you today. As you can see, I used the gold embossing powder on my greeting but I also used the WOW Embossing Pen on the flower shapes around the frame to color them gold as well as the earrings and brooch, which on which I used the Clear Gloss Super Fine Embossing Powder to give them the look of crystal and onyx. In addition, I pressed the edges of the image, which I die cut with a Spellbinders die, into my embossing pad and dusted them with the same gold powder. I used it again on the inside sentiment. The gold powder just fits so well with many of my project designs and has become my regular "go-to" powder, especially when I'm making cards.


With Spring just around the corner, I'm looking forward to warmer weather and flowers in bloom. It's almost time to start those  St. Patrick's Day, Easter and Passover cards and gifts too. Look for lots of inspiration for your springtime projects right here in the coming weeks.  Thanks for stopping by today! I'll be back late tomorrow to show you the card I made for my son's birthday. I didn't want to post it before I gave it to him for fear he might stumble across it here. Until then, have a wonderful Friday and ...

Happy crafting!
Anniebee


Friday, November 30, 2012

WOW Embossing Powders meets Graphic 45

Hello, Wow fans! Anne here.  It's the last day of November and soon Christmas will be knocking on our doors. I'm sure a lot of you industrious people have already put up your trees, decorated them, adorned the exterior with lights and lawn ornaments and have all your shopping done and packages wrapped. Well, guess what... I haven't bought the first gift yet. Truth be known, all of my gifts will be hand made this year as money is awfully tight and there's no room in my budget for shopping. 

I have for you today a mini album I made featuring Graphic 45's A Ladies' Journal collection and lots of WOW! Embossing Powders and Clear Stamps. I'm going to cut right to the chase and show it to you as there are several pages in this little book.


This collection by Graphic 45 is absolutely gorgeous.  I have been wanting to do this for quite some time and when I was assigned to do a mini or scrapbook layout, guess which one I chose!


Below is a waterfall feature where the recipient can put photos, journaling or anything else she wants. There is a tab hidden under the layers of photo mats. When you pull the tab, the layers flip up one at a time to reveal the one underneath it. I don't know who came up with this idea but she/he is a genius! It's a very clever design.


As you can tell from the photo below, all of the envelopes, pockets and waterfall flips work... they aren't just for looks. 


Below is the back of the album.  The graphics in this G45 collection are so elegant and feminine and remind us of a simpler time with their Victorian and Elizabethan flavor. 


The embossing powders I used were: Metallic Gold Regular, Metallic Copper Regular, Neutral Ultra Shimmer, Opaque White and Primary Ebony. The stamp sets I used were With Love, Simply Amazing, Brocade and Make A Wish. 

I hope you enjoyed seeing this little book. I have a little more embellishing to do and a few tags to make before I can say this project is complete but I'm really happy with the way it turned out. It's going to a special person on my Christmas list. Mini albums are a lot of work but the results are usually so eye-catching it makes all the extra effort worthwhile. 

I am entering this project in the following challenges:

TBD

Thanks for stopping by my blog today. I hope you'll pop over to the WOW blog too and check out some of the lovely projects made by my teammates. Until next time....

Happy crafting!
Anniebee


Saturday, November 10, 2012

New Year's Eve Party Invitations using WOW Embossing Powders

Hello, friends! Happy Saturday to you! I hope that by now you're giving some serious thought to planning your holiday-themed projects. Every year, the big 3 (Thanksgiving, Christmas and New Years) creep up on me and I always have to rush around to complete my craft projects in time for gift giving, party planning or what have you. Well, when my WOW team leader, Jen, asked us to use non-traditional colors to create holiday projects, I felt a little trepidation because I am a confessed traditionalist when it comes to holidays, especially Thanksgiving and Christmas. My family grew up with traditions passed down from relatives who are no longer with us and we added a couple of our own to the mix as well.  Jen also asked for a volunteer to tackle New Year's Eve party invitations and after thinking about that for a split second, I jumped at the chance! That would allow me to comply with the assigned theme without forcing me too far outside my comfort zone with regards to traditional Thanksgiving and Christmas fare! So I set about the task of choosing a non-traditional color palette with the aide of some suggestions from Jen.  I chose yellow, grey and white but I added a couple of other colors (silver and black) to the mix and came up with what I think is a pretty cute design for my hand crafted invitations.  See what you think. I'll even give you the basic instructions for making your own invitations just like them.


The cards are 6" square and made from DCWV Shimmer cardstock in a silver/pewter shade. The papers are from DCWV's Lemon Flower stack and the digi stamp, by Kenny K, is called Happy Hour which is available for purchase here. I hand colored the image with Copic markers and used my WOW Embossing pen and Metallic Platinum Sparkle to create the glittery effect on her polka dotted dress and Neutral Ultra Shimmer and Clear Gloss Regular for her martini glass. Then I colored her beads with silver gel pen and attached tiny rhinestones for her pendant and earring.


It wasn't easy coloring 5 identical characters but I think they are close enough that one would have to study pretty closely them to see the variations between them.


I found the cute little placards in the do-it-yourself invitation section at Michael's but they would be fairly easy to create with a die or die cut machine and coordinating patterned paper to match your own design in any color. I used a generic stamp and Metallic Silver Regular on the "Please Join Us" and "Kiss at Midnight" and "2012" are stickers. I used a black gel pen to print "for a" because I had no stamps to use for that part. I thought it would be fun to give my soiree a title that I can use each year and when I found the New Years sticker set, I knew Kiss At Midnight would be perfect! Isn't it nice with things just seem to fall together so easily?


In keeping with my tendency toward the traditional, I included a large clock in my design made from Tim Holtz's Sizzix Bigz die called "Weathered Clock" that I embossed with WOW Black Glint powder.  I traced the outline of the clock on cream cardstock and cut just inside the lines to make the background and then distressed it and stamped and colored the center design where I would be attaching the hands. The banner and party details are embossed with Metallic Silver Regular  and outlined with silver gel pen. I added rhinestone accents at each hour on the clock to give it a bit of bling. After all, New Years is all about glitz and glam, right?


I added a bow of black grosgrain ribbon with silver star buttons attached with sparkly silver cording as a finishing touch. I have included several close-ups to show the details more clearly.


Sooooo... are you ready to tackle your own set of party invitations now?  I encourage you to try it.  Once you get on a roll and get a rhythm established it really doesn't take that long to do.... unless you're inviting a large number of guests, that is! LOL 

Please stop by the WOW Blog to see the other non-traditional holiday projects created by my teammates.  I'm sure there is something there to inspire you even if you aren't up for making invitations. That's it for today but I'll be back tomorrow with another new project for Kenny K's Krafty Krew so I hope to see you then. 

I am entering these cards into the following challenges:

One Stop Craft Challenge - Anything Goes
Sweet Stampin' Challenge - Anything Goes
Fat Pages and Cards - #26 Anything Goes
Pause, Dream, Enjoy - #45 - Food & Beverage

Happy crafting!
Annibee

Wednesday, June 27, 2012

A New Card for WOW Embossing Powders

Hi and Happy Wednesday, friends! What a week this has been so far! If you read my last post, you know that I was blessed by being selected to be a guest designer for the Saturated Canary for the summer!  A new release is scheduled for today too so if you're as big a fan as I am, you'll want to pop over there and check them out!

Today, I have a new card I made for WOW Embossing Powders using a digi from another of my favorite illustrators, Phee McFaddell.  I haven't posted anything using her images for a while now so I thought it might be a nice change of pace for you guys.  I also used LOTS of WOW Embossing Powder.

This card is a whopping 6" x 8", at least an inch bigger all the way around than the cards I usually make.  And believe it or not, I'm working on one even bigger than this using a Saturated Canary digi!! Well, I live in Texas... what can I say?! LOL!


I actually intentionally made the card large because I wanted plenty of the patterned paper (from DCWV's All Dressed Up stack), as well as the dry embossed oval to show behind my focal image.


I started by dry embossing a piece of white cardstock by inking my embossing folder with Quick Quotes Pink Cheeks Powderpuff Chalk ink. The ink transferred from the folder to the paper during the process. Next, I used dies to cut the oval from the embossed cardstock as well as a pink and a black mat.  Then I ran a Versamark Embossing stamp pad over the raised areas and applied WOW Bright White Embossing Powder over the entire area. After turning the oval over and tapping it to remove all the excess powder, I used my heat tool to melt the powder.  


I used Primary Ebony Powder to emboss the two flourishes which were made from chipboard with a Tim Holtz die.  I used the WOW! stamp set called "Gratitude" to create the greeting and the ticket and used a Shock Pink (RV04) Copic marker to color in the stamped and embossed images and fussy cut them to go on my card.


I added a mulberry paper rose, some velvet hydrangea blossoms from Petaloo, a glittery chipboard die cut from my stash and some pearls and Voila! A beautiful finished card fit for a queen (or princess, as the case may be).


Please visit the WOW blog to see some incredibly creative projects made by my talented teammates.  And if you're planning to attend CHA, don't forget to stop by the WOW booth and say hi to Suzy West and some members of the design team. That's it for today, peeps! Thanks for stopping by today.  I love reading your comments if you care to leave one.  Until next time...


Happy crafting!
Anniebee

Saturday, June 9, 2012

Steampunk Debutante Book Card for Wow Embossing Powders

Hello again, everybody!

This is my second post for today.  I totally forgot that my team's projects for WOW Embossing Powders would be published on the WOW blog today and didn't schedule my post to coincide with that one.  Sorry, WOW fans!

This month, I created a book card that was inspired by a tutorial I found on You Tube by someone on Split Coast Stampers, I think.  I modified it a little with my own touches because I wanted to create a piece that could withstand years of being on display.  This is not your ordinary card.  It's a 3-dimensional piece of paper art!

I used Graphic 45's Steampunk Debutante collection for this one.  I truly adore their papers and coordinating embellishments and this is one of my very favorites.  I also love everything Steampunk so this was a natural selection for me.  There was no way to improve on the title so I used it for the title of my "book".

Lots of pics in this post so get comfy!


I just love the colors in this collection and the graphic designs are outstanding.


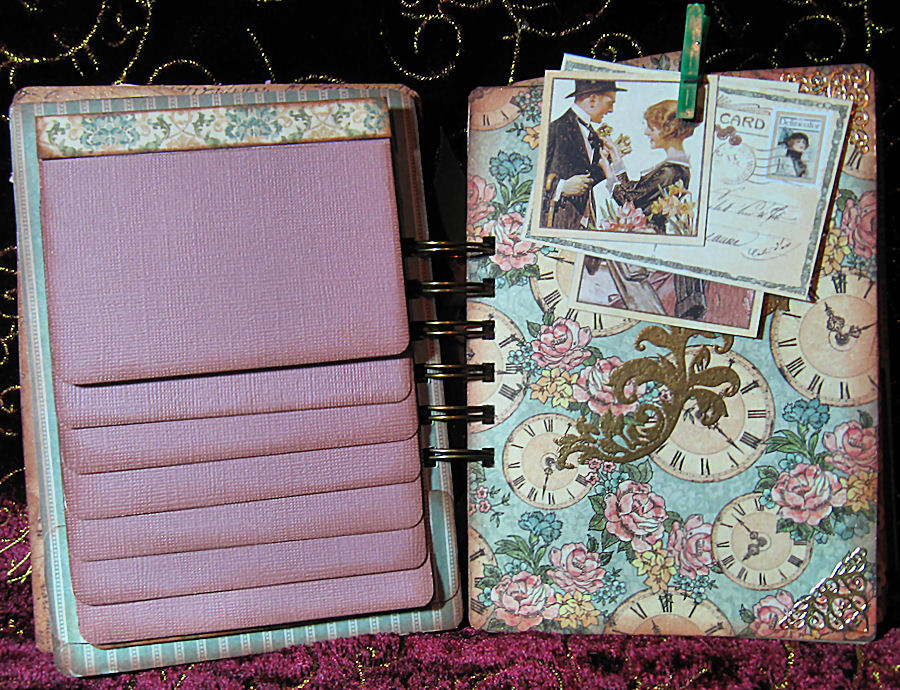
 You may be able to tell in the above photo that I constructed the cover for my book with chipboard and covered it with the papers, very similarly to the way a bookbinder does it.


A sneak peak of the inside.


When you open the book, the inside is a shadowbox display containing gears, flowers, butterflies and metal embellishments. The "pages" of the book are an illusion created by fan-folding four pages of beige cardstock and attaching them to one another to make the shadowbox.  I ink the edges of the pages with brown distress ink to make them look like aged paper.


The large clock face on the inside cover was made with a Tim Holtz Alterations Bigz die by Sizzix. 


I coated it very liberally with Versamark embossing ink and then covered it with WOW Primary Ebony embossing powder.  After I heat set that, I used an embossing pen and inked the edges of the clock and sprinkled it with the Regular Gold embossing powder and heat set it again.  I also used the Gold on the hands of the clock.


The flowers were arranged and glued in place one by one using Beacon's 3-in-1 Advanced Craft Glue. The edges of the white rose in the bottom right corner are embossed with the Regular Gold WOW powder as well.


This is the back cover of my book.  The label at the bottom is intended to write a little note to the recipient and is, therefore, left blank. 


After the above photos were taken, I changed the inside cover just a little.  I found some cute metal gears by Tim Holtz that I had bought ages ago and that worked perfectly with this project so I added them to the bottom of the clock.  I moved the little chipboard domino to the shadowbox side.  Here's how it looks now.


Here's a detail shot of the little gears.

So there you have it.  These book cards take a little time and patience to make but they are so worth the effort.  I'll post a tutorial later for making it so you can try it for yourself if you want to.  Ha! I can't believe that I just noticed that I forgot to put the "E" on the end of "Debutante" on the spine of the book!!  That MUST be corrected right away!  I just don't want my readers to think I don't know how to spell. LOL!

Thanks so much for stopping by today.  I hope you enjoyed this project and that you'll visit me again soon.  I'll have a card using a Mo Manning digi tomorrow that I really like.  Until then...

Happy crafting!
Anniebee

Monday, May 14, 2012

Altered Photo Storage Box for Wow

Hello, all! It doesn't appear that as many people are visiting the Wow Blog as we had hoped so I'm posting my team project here so my friends and followers can see it. As stated in my last post, my team lead, Jen, tasked us with using fabrics and/or flowers on our projects for this month. I used fabric on my card and I have used paper that looks like fabric and lots of flowers on this one. Jen asked me to alter a photo storage box... something I haven't seen very often. As a matter of fact, I went in search of inspiration and found very little on You Tube or anywhere else on the web. So without further ado, here is my project. I made a treasure box in which to store photos and other memorabilia.


Since I took these photos, I have replaced the butterfly with a blue one and lined the box with velvet paper (it's so much easier to work with than fabric!). I used lots of WOW Metallic Gold Rich-Pale Regular Embossing Powder on this project. The vase of roses is a digi stamp by Delicious Doodles that I colored with Copic markers. I plan to make a mini album to go inside this box and give it to my beautiful granddaughter.

I'm still working on some new cards that I'll start posting later in the week. Several of them are finished but I still have to take and edit the photos and the past several days have been overcast and rainy so I plan on doing that part tomorrow.

Thanks so much for hanging with me through all the ups and downs I have experienced lately. I still have hope that something good in the way of a job will come along but in the meantime, I am going to keep creating as long as my muse allows it. So until later....

Happy crafting!
Anniebee

Wednesday, May 9, 2012

Fairy Friends for Wow Embossing Powders DT

Hi, everybody! I know you think I ran off somewhere or worse. Not so... but much has happened since my last blog post. If you're a follower, you'll know that I finally found a new job after having been laid off for 18 months. Well, I was just getting comfortable with my position and learning a whole new business that I had known nothing about beforehand when our office manager and two of the inside sales guys up and quit! That put the operation in such a bind that the almighty "powers that be" made the hasty decision to close down the office portion of the branch and move that part of the operations to Louisville, KY. Soooo.... they laid me and my co-worker off with no notice whatsoever and no severance!! I was completely floored and disheartened at this unexpected turn of events. So, as you have probably surmised, I am searching for a new job yet again.

Needless to say, I haven't exactly been in a creative frame of mind since that day but I am slowly pulling myself up by my bootstraps and have decided to adapt that lovely French saying, "Que sera, sera" as my personal slogan. In case you don't know what it means, it translates to "what will be, will be". There is nothing I could have done to prevent it so I just have to have faith that there is something bigger and better waiting out there for me... somewhere. If my employment wasn't my only source of income, it would still be a huge inconvenience but as it is, it's devastating!

Anyway, I forced myself to work on something creative these past few days. Besides, I had 2 projects due this week for my WOW Embossing Powders DT so I had to get my act together whether I was in the mood or not! LOL!  Below is a card I made using bits and scraps of fabric supplied by my lovely team leader, Jen. She challenged us to use fabric in our projects this month which was indeed a challenge for me.  I have used fabric in other types of projects but not in my card making. When I opened the envelope she sent me, there was this really cute floral stripe, a couple of strips of the gold batik and the bright orange lace that all coordinated perfectly with this adorable little fairy digi I found at Sweet Coloring Pages and had colored up some time back but had never used on a card.  It was the perfect thing for this project so I set to work.


 I wanted to machine stitch the fabric to my card but my machine wasn't very cooperative and but for my Taurus tenacity, I would have abandoned that thought completely.  I finally got 'er done though and then just had fun embellishing.


The WOW Embossing Powders I used were Metalline Green and Primary Ebony. If you click on the photos to enlarge them, you'll discover that the fairy is talking to her little wormy friend popping out from his hole.  I apologize that I didn't realize when I was snapping the pictures that the leafy vine all but blocked him from view. He's not hiding so well when you see the card in person.


As most of you know, I nearly always (unless I'm doing a clean & simple design which is rarely) decorate the insides of my cards as well as the front because I think it just makes them appear more finished.  


I had these cute fairy dimensional stickers that were perfect to go inside the card.  I inked the edges of a white circle to create a place for the giver to write their own heart-felt sentiments.


So there you have it... my first creative endeavor in almost a month! It's not the last though. I have already completed another card that I will post in the next day or two and an altered project for our WOW team post scheduled for this coming Saturday. I'm also working on a few more cards that I will post as I get them finished in between my job search sessions. I would appreciate your prayers and positive thoughts for finding a new position. Thanks so much for dropping by today and please don't forget to visit the WOW Blog today and Saturday to see my projects as well as those created by my talented teammates posted there.  Until next time, thank you for your patience and understanding.

Happy crafting!
Anniebee