Showing posts with label Petaloo. Show all posts

Saturday, December 15, 2012

WOW Embossing Powders DT Post

Hi, everybody!

I know I haven't posted in a few days and there's good reason for it. I have been working on Christmas gifts and cards as I'm sure many of you are and I have also been working on come commissioned work. This is my favorite time of year but it sure gets hectic here toward the last couple of weeks before Christmas. I still have cards to mail out that haven't even been made yet! Yikes!

Well, this is the week that the 6 Girls and a Smoking Gun team get to present our team projects for WOW Embossing Powders! I really enjoy our team efforts as we're given fairly specific assignments or at least specific themes we must use in creating our projects and it's always fun for us to see what our teammates have done. This time, we were supposed to create some type of holiday themed ornament, treat cone or something along those lines and I chose to make a lovely Victorian-inspired treat cone.

I tried to use papers and embellishments that remind me of that period in history.  I think I may have mentioned before that I used to craft antique reproduction porcelain dolls from that era so I am fairly familiar with the types of decorations that were used.


I created the template for this cone myself as I couldn't find one I really loved online. The top of each panel is rounded (you can see it better in the next photo), though I made a second template with flat tops for the gents and to use with different types of trimming. The poinsettia/berry spray is by Petaloo and the red velvet ribbon is from my stash.


The various embellishments I used were from different manufacturers including K & Company, The Paper Studio, Studio 112 and Recollections.


The papers are from DCWV's Holiday Collection a couple of years ago. The little pearl strings are a by-the-yard trimming that I purchased at Jo-Ann some time ago as well.


I really love this ornate cross, which was created with a rubber stamp I got from Michael's. I used Metallic Gold Rich Pale Regular, Sierra Sunrise, Tea Garden Green and Neutral Ultra Shimmer powders to create this one of a kind treat cone. The lace I used around the top is very expensive silk lace that has been in my stash for several years and was perfect for this little decoration so I decided that the time to use it had finally arrived.

If you're still making Christmas projects like I am, be sure and stop by the WOW blog to see the beautiful projects created by my talented teammates. I haven't seen them yet but I have no doubt that they are fabulous, as always.

Have a marvelous weekend. My son and I are going to see the first installment of "The Hobbit" tomorrow night and I can't wait! I have been a huge fan of Lord of the Rings since I was in high school and that's a very, very long time! LOL I think Peter Jackson has done a fabulous job of bringing the characters and tales of J.R.R. Tolkien to life on the big screen.

I am entering this project in the following challenges:

Really Reasonable Ribbons - Challenge #62 Anything Goes & Ribbon

Well, that's all I have for you today, folks. I'll be back soon with a few more holiday cards and possibly another cone or two (or more)! Thanks for visiting my blog. I value your comments so please feel free to tell me what you think. Until next time...

Happy crafting!
Anniebee

Sunday, December 9, 2012

A New Challenge at Kenny K's Krafy Krew

Gosh! It's Sunday again already? I just don't know where this week has gone, much less this year! It has really flown by that's for sure. Winter keeps coming and going around here and I understand it's supposed to be back some time Monday. I think it was about 85 degrees here today and my air conditioner kept cutting on and off. I have spent the entirity of the past 2 days in my craft room, working on a couple of design team projects, 2 commissioned cards and a birthday card.  I still have one more card and another design team project to work on today.  I'm trying to get them finished up so I can concentrate some time on Christmas gifts I need to make. Good thing I work well under pressure!

Sooo... today is the start of a brand new challenge at Kenny K's Krafty Krew and this time the theme is "Silver and White". This really was a big challenge for me as I usually use several colors in my projects and although I love this combination (if you can call it that), I had to reign in my desire to "color it up"! LOL I think I did pretty well but I'll let you decide for yourselves. But first, I need to get some challenge details out of the way.


This weeks first sponsor is Kenny K's Downloads


The prize from Kenny is the winner's choice of 5 digi's.

And our second sponsor is 


For more information on new releases from 
Marianne Design please follow them on


Now, for my card.


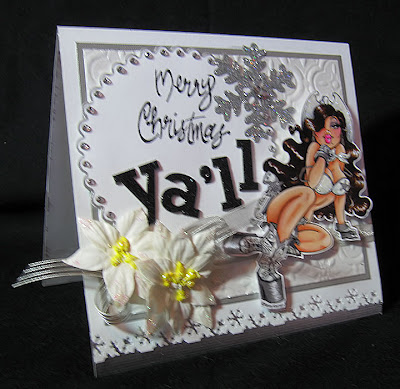
This divine creature is called "Mae Western" and she is very fun to color. She is available for purchase here. I used a pearlized white embossed paper for the background and an EK Success border punch to make the snowflakes at the bottom.


I glittered Mae's hat, scarf and top with Diamond Dust glitter and used metallic silver gel pen to color the silver accents on her costume.


 The scalloped circle was made with a Nestie, outlined in silver gel pen and the rhinestones were glued on one at a time. 


The white poinsettias are from Petaloo and the silver ribbon came from Michael's dollar bin. The glittery snowflake is a sticker that I got from Hobby Lobby about 3 years ago. I don't know if they still carry them but I'd like to have several more packages of them.  I seem to use them on my cards every year and I don't have many left now.


 Above is a close up showing all of Mae's voluptuous details. What I'd give to have a body like this gal! LOL!


Don't you love her silver and white platform cowboy boots? I hope you'll take a few minutes to drop by the Krafty Krew site to see what my teammates have done to inspire you. We'd love to have you join us in this challenge as well.

I'm entering this card in the following challenges:

Color Me Creative Classroom Copic Challenge #58 - Metallic Gleam
Here Come The Boys #42- Anything Goes 

That's all I have for you today but I'll be back soon with a bunch of new cards and a couple of other projects. I hope you're all getting ready for the holiday as it will be here before we know it. Have a wonderful day, a productive week and until next time...

Happy crafting!
Anniebee


Wednesday, January 25, 2012

Last project for Blog Quick Quotes

Hi, everybody!  It's hump day and also the day of my last post as guest designer for Blog Quick Quotes.  For this post I created another layout featuring a photo of my pretty niece, Kirsten.  The Julie Je T'aime papers by Quick Quotes created the perfect backdrop for this photo.  This line is my favorite of all of the Quick Quotes paper lines and the colors coordinate so well with the photo.


The beautiful flowers are from Petaloo and the butterfly and dragonfly die cuts are by K & Company. I'd like to thank the folks at Quick Quotes for having me as their guest this month and I wish them continued success in 2012.  Stay tuned for my last post for the Joy's Life Design team, which will be posted shortly.  Be back in a few...

Anniebee

Friday, January 20, 2012

My first project for WOW!

Hi, everybody! Well, I didn't have a chance to post the extra projects I mentioned but I'm hoping that this one will make up for my very brief absence. I am finally ready to reveal my first design team project for WOW! Embossing Powders!!! I have been so excited about this new company and I am both honored and humbled to have been selected as a member of their first U.S. design team. You won't believe the talent of the other members of this international team.

I have always loved using embossing powders to add dimension and interest to my greeting cards but there are soooo many other ways to use them and Suzy West, the U.S. Marketing Director for Wow has developed her own line of absolutely delicious colors making them even more fun and adding even more creativity to your paper crafting! You really should try them.

For my first project, I wanted to do something completely different than anything I had seen being done by my teammates and other crafters around the web. I found a really pretty square acrylic plate charger at Hobby Lobby and thought it would make an interesting base for creating a 3D altered art project. I liked the fact that it wasn't the typical round shape like most of them are.


First I cut a piece of scrapbook paper to the size that would fit perfectly in the depressed area intended for the bottom of the plate and rounded the corners with my Corner Chomper. The paper is from an 8" DCWV stack called The Colorful Life, which was designed by Donna Estabrooks. All the pages in this little stack are very colorful and very artsy-fartsy, as I like to say. I'll be making another project with these papers that should be ready to post in a couple of weeks so stay tuned for that.


Next, I took the beautiful little fairy, which is a digital image created by none other than Phee McFaddell, colored her with my Copic markers in colors that would coordinate well with the background and cut her out. I stamped the butterfly outline from WOW's Build a Butterfly stamp set in Top Boss embossing medium onto white vellum paper and again on white cardstock in black Memento ink. I used WOW Earthtone Grape Regular embossing powder on the vellum and after heat setting it, I colored both layers with my Copics and cut them out. I mounted the vellum layer on top and added purple flat-back pearls for thebutterfies' bodies.


Then I added a rhinestone flourish in pale pink on the background and started arranging the flowers, most of which are from Petaloo, the way I wanted them before I began to adhere them to the surface. I made the turquoise rose from organza ribbon and glued a half-back pearl in its center. After affixing all the flowers, I placed the butterflies where I wanted them and Voila! I had made a sort of framed diorama that can be hung on the wall or displayed on a plate easel.

Be sure and stop by the WOW blog and see what my very talented teammates have created to inspire you to try this wonderful new line of embossing powders and stamps for yourself.  Monday is my day to post on the Wow blog and I'll have a cool layout to show you so if you love to scrap, you'll definitely want to check it out.

Thanks for visiting today. I hope you enjoyed seeing this little project as much as I enjoyed making it. As always, your comments are encouraged and appreciated.  And don't forget to ask your local scrapbooking store to stock WOW! products!

Until next time....
Anniebee

Friday, January 6, 2012

My first project as guest designer for Blog Quick Quotes


Hello and good day, everybody!  I told you last week that I had been invited to be a guest designer on Blog Quick Quotes for the entire month of January and today I am posting my first project created with their fabulous products.  For this card, I used my favorite of their paper lines, called Julie Je T'aime.  I love the varying shades of purple, turquoise, gold, cream and black that are utilized throughout the collection.  To me, it has a whimsical feel with a touch of elegance and pairs beautifully with the Petaloo Flora Doodles that were part of the awesome prize pack I won from Petaloo during their joint blog hop with Quick Quotes a while back.


This cute little fairy person was created as a digi stamp by Phee McFaddell, who as my regular readers know, is one of my favorite illustrators.  I colored her with Copics in tones that coordinate with the Julie Je T'aime papers.  I used the #300 paper (striped side) for the front and back of the card and #200 (the purple with turquoise swirly flourishes on the inside.  The part of the sentiment on the right side is created with silver glittered alphabet stickers in two different fonts.  I shaded around the letters with a light shade of tonal gray Copic marker to make them show up better on the background.  The part on the left was made using rub-on letters that I have had in my stash for so long, I don't remember who made them.  I cut the window with a Spellbinders die, which was a bit of a trick since the card is too wide to go through my Cuttlebug opened up.  The butterfly die cut is from K & Company, the "SPARKLE" on the front is a puffy sticker that I have had for quite a while too but I think the set is still available in stores.  I just don't recall who makes them.  The purple ric rac is from Michael's.  I think this card will go to my granddaughter, whose birthday is in March.

Thanks for stopping by today.  I hope you'll take a few minutes to visit Quick Quotes and see all of their awesome products and also their blog.  Their design team is incredibly talented! I'll have more projects including some scrapbook layouts and a tutorial later in the month so please check back on the 10th for the next one.

Before I go, I'd like to give a shout out to Rhonda, Lisa and the QQ Design Team for asking me to join them this month!  You ladies ROCK!  Until next time...

Happy crafting!
Anniebee 

Wednesday, December 14, 2011

Joy's Life Family Time Design Team Project

Hi, everybody!  I am sorry to have been MIA for so long.  Something came up over the past couple of weeks that I can't really talk about just yet.  For now, all I can tell you is that I was selected for another design team that will start crankin' next month!  It's a great opportunity for me and my term with the team will last a full year!  Woohoo!!!  I'm very excited and can't wait to tell you about it but I have to wait for the okay before I can say any more.

In the meantime, I have been trying to catch up on my Christmas card making and working on a project for Joy's Life.  This week, Group 2 of Joy's Design Team will be featuring projects made with a family theme.  I actually made 2 projects that kind of go together.  You'll see what I mean when you see them.  There are quite a few pictures so get comfy!

The first one is a Christmas-themed layout.  The photos I used are of my sister, Patty's, family that were taken on Christmas morning of 2009, her last Christmas on this earth.  I know some of my regular readers may get tired of reading this but since I have quite a few new followers, I guess I should explain that Patty lost her 6-year battle with stage 4 breast cancer in May, 2010.  I treasure all of my pictures of her and since Christmas was her favorite holiday, I thought it would be a nice way to remember her this season.


The patterned cardstock is from K and Company as are the chipboard embellishments.  The photo mats are made from foil cardstock by American Crafts that I punched with a border punch from ek Success.  I outlined the patterened paper shape with green Stickles to add visual interest and also to make the layout look more "finished".


I love this big red and white striped bow made from ribbon I bought at Michael's.


I made this festive wreath using Martha Stewart's medium branch punch which is becoming increasingly hard to find.  I punched the branches from 3 different shades of green cardstock and adhered them one by one to a 2D wreath template and adorned the finished product with different colors of round gems, some holly from K and Company, a bit of organza ribbon and a poinsettia from Petaloo.  
The stamp I used for this layout is from the Joy's Life Wintery Puns stamp set that can be purchased on Joy's website.  The tag was created with a Spellbinders Fancy Tags die and the same green foil cardstock I used on the photo mats. 

My other project is a Christmas card that I made using one of the same photos I used on the layout.  


The patterned cardstock I used on this one is from a DCWV Holiday Collection paper pack that I bought from Hobby Lobby last year and the ribbon is from Michael's.


The stamps I used on this one are from Joy's Everyday Occasions and Holiday Occasions stamp sets and can be purchased from her website.

I am entering this layout in the following challenges:


That's all I have for you today.  I hope you were able to glean some bits of inspiration from these projects. I'll be back with some more Christmas cards later in the week. So, until next time...

Happy crafting!!!
Anniebee

Tuesday, October 25, 2011

New Scrapbook Layout for Quick Quotes Friday Challenge

Wow! Three posts in one day again... this seems to be becoming a regular thing for me, doesn't it? LOL  Well, I didn't HAVE to post this one today but I wanted to go ahead and enter it in the Quick Quotes Friday Challenge so I needed to post it here first.  As mentioned in one of my earlier posts for today, this layout is much more whimsical than the last one I made.  It may not do as well in the challenges because of that but I really like it and I think the young mother in the photograph will love it too.  She is niece by marriage to my baby brother and that's her adorable daughter in the picture with her.  She is due in a few weeks with her second child so I'll have a whole new wealth of pictures to use in my layouts.

I need to do some pages for my grandkids if I can get some good pictures of them.  My grandson is no problem and I have a few page-worthy photos of him already but my granddaughter is at that age where she hates for people to take pictures of her, even though she takes them all the time with the camera on her cell phone!  Unfortunately those are not the best for scrapping! I'm hoping if she sees some of my pages, she'll decide it's okay to let mom and dad take a few shots for me.  We'll see...

But now, for the one I just finished.  I did this one all in pink, black and white and used some of my handmade paper roses as well as some Petaloo Mulberry flowers to embellish the page.  I think it looks really sweet and girly and both of these young ladies are the epitome of girly!!  I'm not sure it's obvious in the photo but the little girl is wearing a pale pink ballet leotard and tutu. I created another layout a while back featuring this little cutie pie which you can see here if you're interested.


The next couple of pictures are close up views of the roses I made using black and white designer paper that I colored with Copics.  The actual shade of pink is a bit more vibrant than it appears here.  The petals are dusted with very fine iridescent glitter and are very sparkly.  That detail is also lost in the photos. The black organza bow shows up best in the next shot.


I had a bit of trouble photographing this one for some reason.  The lovely pink of the designer paper looked washed out in the upper right quadrant and I had to adjust the lighting a couple of times to get it to look right.  These are the best shots I could get.  It's extremely windy outside so it was impossible to take the pictures out there.  Thanks for visiting my blog today and if this is your second or even third time here, I REALLY appreciate your patience and perseverance!

I have more things in store for you over the coming days so I hope to "see" you again very soon.  Until then....

Happy crafting!
Anniebee