Showing posts with label Thank you card. Show all posts

Monday, March 11, 2013

1890s Hat (Rick St. Dennis)

Hi, all! Well, we've all survived another Monday it seems. I'm going to keep this short and sweet as this card is made specifically for the final challenge at Sparkle and Glitter, the Rick St. Dennis Challenge Blog. Such a shame too because I had intended to apply for the design team next time there was a call. It's apparent that there are some exciting changes to come but what they are hasn't yet been revealed. Anyway, I am posting this card late in the evening so I can get it entered into the challenge before it closes on Wednesday. I may have one more entry tomorrow night. The theme for this last challenge is "Spring is in the Air". This fabulous hat as well as the colors I used just says Springtime to me.


I'm entering this card into the following challenges:
Sparkle and Glitter, the Rick St. Dennis Challenge Blog - #11 Spring is in the Air
That's it for right now. Check back tomorrow for another of Rick's pretty ladies. Thanks for visiting and I hope you'll come back soon. As always, your comments are both welcome and very much appreciated. Until next time...
Happy crafting!
Anniebee

Thursday, November 29, 2012

A Mo Manning Thank You Card

Wow! Can you guys believe that Christmas is less than a month away??? I sure can't!! I'm nowhere near ready for it and still have some cards and gifts to make. I don't know how in the world I'll get them all finished in time. I guess I'll just put one foot in front of the other and hope that I get there before time runs out.

Today, I have a card that I made for my daughter-in-law last week. She has been such a sweetheart since I moved down here and has gone out of her way to help not only with the move but also by lending a hand whenever I have needed it. So I wanted to tell her in my own way how much I love her and appreciate everything she does for everybody, myself included.

I used this sweet image by Mo Manning, called Alisa with Roses. I have made a couple of cards with this one before but I think this one is my favorite of the three. I just think this is the sweetest little girl and makes into such a soft and feminine card. 


Here's the inside of the card.

The photo above shows the box/envelope I made to go with the card. I had to improvise a bit because the card is a bit large and quite dimensional with all the flowers on it and I had no cardstock larger than 12"x12" on hand. It turned out quite well though, I think.

Supplies used:

Image - Alisa with Roses by Mo Manning
Copic markers
Sentiment stamp - Studio G (front); TPC Studio (inside)
Martha Stewart Punch Around the Page punch set - Deco Fan
Butterflies - (gold glitter) Martha Stewart Classic Butterfly; (pink) Memory Box Kaleidoscope Butterfly
Evergreen branches - Martha Stewart branch punch
Corner Punch - Manufacturer unknown
Cardstock from the DCWV Modern Bouquet stack for the envelope
White Cardstock - Coordinations
Branch and leaves diecuts - Sizzix 
Flowers - I Am Roses
Quick Quotes Powderpuff Chalk Ink - Pink Cheeks
Pink rhinestone flourish - Prima Say It With Crystals
Pearls - Studio G
Adhesives - Scotch ATG, Aleene's Fast Grab Tacky Glue
Metallic Gold ink - Gelly Roll gel pen
White faux stiches - Gelly Roll gel pen
Foam mounting tape - Front Porch Treasures
Scissors
Paper, dark pink flower buds and ribbon from my stash

I am entering this card in the following challenges:

TBD

This card is a little more frilly than the ones I normally make but I really love this style and will probably make a few more. They allow me to embellish to my heart's content! LOL I hope you enjoyed seeing it.  I'll be back with a new project for WOW! Embossing Powders on Friday and if time permits, I might even have another card for you before then. Thanks for stopping in, have a wonderful week and until next time...

Happy crafting!
Anniebee

Wednesday, June 27, 2012

A New Card for WOW Embossing Powders

Hi and Happy Wednesday, friends! What a week this has been so far! If you read my last post, you know that I was blessed by being selected to be a guest designer for the Saturated Canary for the summer!  A new release is scheduled for today too so if you're as big a fan as I am, you'll want to pop over there and check them out!

Today, I have a new card I made for WOW Embossing Powders using a digi from another of my favorite illustrators, Phee McFaddell.  I haven't posted anything using her images for a while now so I thought it might be a nice change of pace for you guys.  I also used LOTS of WOW Embossing Powder.

This card is a whopping 6" x 8", at least an inch bigger all the way around than the cards I usually make.  And believe it or not, I'm working on one even bigger than this using a Saturated Canary digi!! Well, I live in Texas... what can I say?! LOL!


I actually intentionally made the card large because I wanted plenty of the patterned paper (from DCWV's All Dressed Up stack), as well as the dry embossed oval to show behind my focal image.


I started by dry embossing a piece of white cardstock by inking my embossing folder with Quick Quotes Pink Cheeks Powderpuff Chalk ink. The ink transferred from the folder to the paper during the process. Next, I used dies to cut the oval from the embossed cardstock as well as a pink and a black mat.  Then I ran a Versamark Embossing stamp pad over the raised areas and applied WOW Bright White Embossing Powder over the entire area. After turning the oval over and tapping it to remove all the excess powder, I used my heat tool to melt the powder.  


I used Primary Ebony Powder to emboss the two flourishes which were made from chipboard with a Tim Holtz die.  I used the WOW! stamp set called "Gratitude" to create the greeting and the ticket and used a Shock Pink (RV04) Copic marker to color in the stamped and embossed images and fussy cut them to go on my card.


I added a mulberry paper rose, some velvet hydrangea blossoms from Petaloo, a glittery chipboard die cut from my stash and some pearls and Voila! A beautiful finished card fit for a queen (or princess, as the case may be).


Please visit the WOW blog to see some incredibly creative projects made by my talented teammates.  And if you're planning to attend CHA, don't forget to stop by the WOW booth and say hi to Suzy West and some members of the design team. That's it for today, peeps! Thanks for stopping by today.  I love reading your comments if you care to leave one.  Until next time...


Happy crafting!
Anniebee

Saturday, June 2, 2012

Saturated Canary Thank You Card

Hi, crafty friends! Well, I ended up not posting yesterday after all.  I was finishing up a picture tutorial that I did for a friend of mine and time just got away from me.  But before I crash for the night, or early morning as the case may be, I have yet another Saturated Canary card for you.

This sweet girl is called "Dreads" and I think she is probably my current favorite of all the digis in Krista's shop right now.


I am entering this card in the following challenges:


I'm going to keep this post short and sweet so I can crawl into bed.  I'm pretty beat tonight.  I hope you have enjoyed my card and I hope you'll keep coming back to see what else I have up my sleeve. Thanks so much for stopping by today.  See you tomorrow, I hope!  Until then...

Happy crafting!
Anniebee

Friday, January 27, 2012

An embossed bouquet

TGIF, everybody! Here we are at the end of another week. If the rest of the year goes as quickly as January has, 2013 will be here before we know it! Heaven forbid! It's supposed to be a beautiful weekend though and after the deluge we just had, albeit very much needed, sunshine and warmth is just what this girl needs to give her mojo a little push start.

Today, I want to share with you my first card using 
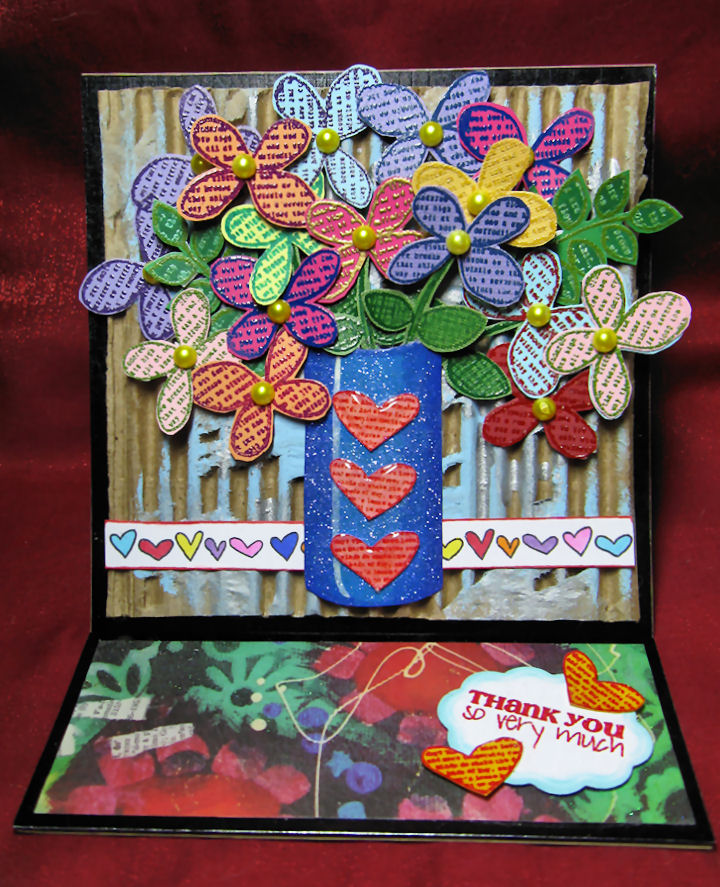
WOW Embossing Powders! I have gotten so used to using primarily digital images on my cards, that I had almost forgotten how much fun it can be to design them using simple shapes and colors. That's exactly what I have done here. I used the WOW "Gratitude" stamp set to create this beautiful vase of flowers.


Each flower is stamped with embossing medium onto different colored cardstock and then embossed with contrasting colors of WOW Embossing Powder. I tinted some white flat-back pearls with a Y08 (Acid Yellow) Copic marker to create the flower centers. I embossed a few of the flowers with the stems in WOW Tea Garden Green on light green cardstock. Then Icut some of the other flowers out and glued them on top of the green flowers so that only the stem and leaves would be green.  I also embossed the leafy stem in Earthtone Olive on a dark green background.


I decided what shape I wanted the vase to be and free-handed it on a scrap of medium blue cardstock and used varying shades of darker blue to shade the outside edges to give the illusion that the vase was actually round. I coated the entire piece in Diamond Glaze and sprinkled it with Crystal Glitter.  To enhance the illusion, I used 3 layers of foam tape to raise the center of the vase and glued the outside edges to the corrugated cardboard I used as my background and to which I sponged a little sky blue and silver acrylic paint. I stamped the heart border stamp onto some white cardstock in Tuxedo Black Memento ink and colored the hearts with Copics in colors that coordinated with the flowers and edged the strip with a red Copic.  I also stamped the triple heart motif onto some pink cardstock, embossed it with Cable Car Red WOW powder and then cut them out and coated them with 2 coats of the Diamond Glaze to give them more dimension.


I used metallic black foil cardstock as a mat for the cardboard background and mounted that onto my 5 1/2" kraft base card.  But there's a little surprise that you may have guessed looking at the pictures.  This is actually an easel card!  Here's how it looks when the easel is folded down.


I cut a piece of 5 1/2" square smooth white cardstock to create the writing area inside the card and then matted a 5 1/2" x 2" strip of some coordinating designer paper, mounted it with foam tape to create the area to support the easel and a place to put my sentiment.  The "Thank You so very much" and cute heart stamps are also part of the Gratitude stamp set.  


As you can see from my photos, these stamps create crisp, detailed images, perfect for embossing or coloring with markers, colored pencils or other media.  The last little surprise is the definition of the word "Gratitude" that I stamped on the inside of the card as seen below.  When the recipient opens it up to read the giver's personal message, they'll see that definition.  I really love this stamp set, which has 3 additional stamps that I didn't use in the making of my card.


I really like how this colorful little card turned out and I can tell you that I'll be giving my Copics a bit of a rest now and then as more and more stamps are added to the WOW line.  I have seen a sneak peek of some of the ones that will be in the next release and I can tell you they are going to be FABULOUS!!  I want them all and can't wait to get my hands on them!

That's all I have for you today.  Please check out the WOW Blog and Facebook page to see the wonderful projects of my talented teammates.  And iof you're going to CHA, be sure to stop by the WOW booth and see their wonderful work in person.  You will be totally amazed at the versatility of these powders and stamps.  They'll help you take your paper crafting to a whole new level!  So until next time...

WOW Embossing Powder colors used:

Tea Garden Green, Bay Area Blue, Earthtone Olive, Cable Car Red, California Sunshine, Earthtone Paprika, Earthtone Blueberry, Earthtone Grape, Metallic Gold Rich Pale Regular.

Happy crafting!
Anniebee


I am entering this card in the following challenges:

TBD

Saturday, October 15, 2011

Another Design Team Friday at JustWordz

Hello and happy Friday, everybody! Friday brings with it another opportunity for the JustWordz design team to inspire you with new projects using the Everyday Sentiments stamp set. I need to remind you too, that if you'd like a chance to join this awesome team, Kim is holding "auditions" for new members right now and there are only a couple of days left to get your application in. All the information can be found on the JustWordz website but you'd better hurry before time runs out!

This week our theme is "Thank You". I have chosen a very pretty image I received from the Crafters'
Digital Art Center as a participant of their Progressive Freebies Challenge. We received 6 new images to play with for this round and this is one of those. It's a lovely mandala. Mandala is the Sanskrit word for circle. You can find another variation of this design that I entered in the CDAC challenge in one of my blog posts from yesterday. It's basically the same except for the coloration of the digi stamp. I enjoyed coloring it so much that I have completed 3 different versions so far. This is he most colorful of the three.


I haven't finished the inside yet so I didn't photograph it. As I stated yesterday, coloring these mandalas is very therapeutic for me. I can completely clear my mind, relax and just let the color flow into the paper.  The only time I have to think at all is when I'm changing colors. This card is 6 inches square but I think I'll try as smaller version that I can use for little thank you cards. There is plenty of information on traditional mandalas on the Internet in case you'd like to learn about their history.

Materials and Supplies:

Base card - DCWV Summer Dreams
DP - My Mind's Eye Home Glitter Book
Image by Daisy Doodles
Greeting stamp - JustWordz Everyday Sentiments
Medium - Copics
Rhinestones and green metal accents - Imaginisce Hot Rocks
Greeting label - Spellbinders Shapeabilities Fancy Tags
Gold metallic Gelly Roll pen

Due to a mix up with the manufacturer, delivery of Kim's two new stamp sets, which are pictured below, was delayed but they have arrived and are ready to ship now! For your convenience, they are available for purchase in her Etsy shop.


I am entering this card in the following challenges:

TBD

That's it for today.  I hope you'll drop by tomorrow for a new project for the Paper a la Mode challenge at The Outlawz.  Until then...

Happy crafting!
Anniebee

Wednesday, July 27, 2011

Another quick card... clean and simple design

Ever have those days when you have to run out to Hallmark and spend 3 or 4 bucks on a card that you forgot you needed or didn't know you needed until the last minute?  I used to have days like that all the time but I don't anymore!  Why?  Because I make cards in advance and store them until I need them.  Besides, I just really enjoy making cards... it's therapeutic for me... so I probably have at least a couple dozen cards on hand at any given time and parts ready to make about the same number more.  By parts, I mean that I have some pre-cut and scored card blanks in several different colors and images that I have already colored to go on them.  I also keep embellishements on hand all the time so it takes between 15 mintues and an hour to put a very pretty card together and have it ready to go to a party or into the mail.

My regular followers know how much I love K & Company.  Well, their dimensional stickers are just the best when it comes to building quick cards.  The one I am showing you today took about 35 minutes to put together and most of that time was spent cutting the paper and punching the corners on the inside mat.  This clean and simple design uses 2 K & Company dimensionals, a piece of ribbon, 5 different papers and a stamp and that's it!  I love this clean and simple style of card making but it's not really my nature.  I have always been a "more is more" kind of girl as you can tell from most of my projects.  However, the elements I use, be they few or many are always strategically placed on my project to create an artful composition that is pleasing to the eye.


I think, with the exception of the papers, the photos are pretty self explanatory so I'm not going to list the deets this time.  As always, if you want more information or have any questions, you can feel free to leave a comment or email me directly and I'll gladly get back to you.

Thanks for dropping by my blog today.  I'm working on a couple design team projects as well as a baby gift for a friend but if I have time to take pictures later, I'll post another card tomorrow.  Friday I'll be posting my second project for Just Wordz Clear Stamps and I'm excited for you to see it.  Kim will have sneak peeks of it, as well as the projects of the my teamies on her blog.  You'll also have another chance to enter her giveaway for a set of her Everyday Sentiment stamps.  Until then....

Happy crafting!
Anniebee

Wednesday, June 15, 2011

Sunday CAS Challenge at The Outlawz and Don't Forget to Vote!

One of the weekly challenges at The Outlawz is CAS which, in case you didn't know, stands for "clean and simple". Anyone who knows me can attest to the fact that I'm just not a CAS kinda girl. To me, more is more and therefore I get a little bit uptight when the subject comes up. But just for kicks, I decided to try a few CAS cards. I have made 3 so far and I'm pretty happy with the results even though I keep wanting to add stuff to them every time I look at them. I think I might have a slight case of OCD! One thing's for sure... this style definitely saves a lot in the way of supplies because you use so much less in creating them. The theme for this week is a recipe: stripes, green and button(s).  With that in mind, here is my entry.


So what do you think? Did I accomplish the assignment? I really like the way it turned out and I may even become comfortable with this style eventually if I keep practicing. Haha! I'll save the other two for future posts.

The card base is pre-folded white cardstock that comes in a value pack from Michael's. The dp is from DCWV's Doodlin' Around stack and the flower petals are stamped onto purple cardstock from Recollections. The stamps are from Stampin' Up and have most likely been discontinued as I have had them for several years now. I think the set might have been named Build-a-Flower but I'm not sure. I really love this set as it has 5 different style petals and 5 different style centers that you can mix and match to create your own flowers. I hand drew the leaf with a black fine tipped permanent marker onto green DCWV Shimmer cardstock to coordinate with the style of petals I used.  I used green mini ric-rac to create the stem. The Thank You stamp is from Hero Arts. The mats on the interior of the card are cut from the same Shimmer cardstock I used for the leaf and I used the corner punch from Stampin' Up to create the corners to hold the message area and sentiment in place. The sentiment stamp is from Stampabilities and the ribbon and button are from my stash.

Voting Reminder:

Before I forget, those of you who visited my blog during Jillian's Birthday Blog Hop probably know that our host, Deanne, is having a little contest for the hop participants.  She has all of our projects from the 4 days posted on her blog and is asking people to vote for their favorites from each day.  The crafter whose project receives the most votes wins a Cricut Imagine cartridge!  I would appreciate it if you would take just a few minutes out of your busy day to go here and vote (hopefully for my projects but at least for the ones you like best).  Voting will remain open through Sunday.  If you have already voted, thank you!!!

I guess that about does it for now.  I hope you enjoyed my CAS card and if you have never made one in this style, I hope I have inspired you to try it.  Have a blessed day and please visit again soon.

Happy crafting!
Anniebee

Sunday, March 27, 2011

Happy Sunday and two cards

Okay, I have given you a break from my card making so now it's time to get back to it.  As is my habit (though some of you probably think it's not a very good habit! LOL)  when I get a new stamp, I color several versions of the image because I'm still trying to perfect my coloring technique.  Besides that, I can make several cards at the same time and it gives me several different options for building my stash.  In other words, I'll color, say 3 of the same image at one time.  Then I'll make 3 cards... one birthday card, one thank you card and maybe a friendship or sympathy card.  Then when I need a card, it's already made and ready to add my personal note to the recipient.  The only kind of card I need to make more of are masculine ones.  I have the hardest time with those because they generally aren't as pretty and I enjoy making pretty things!  Haha!  I do have a son, grandson, 2 brothers, a brother-in-law and several nephews though so I really need to get my butt in gear and make some "guy" cards!  The problem is that I can't make them all using the same image because all of the men in my life are relatives and it's almost a sure bet that they would discover my secret!  Haha! Maybe I'll have to use my Cricut or Silhouette for those cards.  My machines have been rather neglected since I got the markers so it's about time to blow the dust off and use them anyway.

Here are two variations on the lilies card I posted a while back.  I colored the flowers yellow on the first one but I used the same basic pallette as I did on the card in my original post.  On the second one, the flowers are orange again but the pallette is a little different and I added lace and pearls.  I also layered the lilies to give them the illusion of being 3-dimensional and in case you haven't noticed, I love using butterflies on my cards, especially the ones with flowers as the main motif.


Thanks for dropping by today.  Have a wonderful weekend!  I'm off to do some blog hopping and some laundry.  See ya next time!

Anniebee

Wednesday, March 16, 2011

My First Design Team Project

Okay, so today Amber at Amber's Crafts and Stuff launched her first challenge and my first official project as a member of her Design Team is posted there to help inspire people to participate in the weekly challenges.  The theme of this week's challenge is "stash buster/ anything goes" and except for the stamped image, every piece of paper and cardstock I used was from my scrap box.  I tend to save even small pieces, especially when it comes to designer papers and specialty cardstock.  I like using Core'dinations as the base of my cards because it doesn't crack when you score and fold it.  Here is the card I created as a sample.  I really like the combination of the orange, yellow and turquoise. It feels very tropical to me.


If you haven't already, why not stop by Amber's blog and see what the other talented members of her design team have created.  Then kick your mojo into high gear and create your own project to enter into our challenge.  As always, I appreciate your comments.  Thanks for stopping by and have a wonderful Thursday!

Anniebee