Showing posts with label butterfly. Show all posts

Saturday, July 7, 2012

7 Girls and a Smoking Gun Team post at WOW Embossing Powders blog

Whew! What a title, huh?  Well, the WOW design team is quite large and as such, it's broken down into smaller groups of 6 or 7 designers.  My group was originally called 6 Girls and a Smoking Gun but we recently added a new team member, Donna O'Leary, so of course our name had to change to include her. Each Saturday one of the teams is showcased on the WOW blog and this is our week.

Please visit the WOW blog to see the lovely projects my talented heat-gun-toting teammates have created.  Here is my project. I have included lots of pictures to show all the detail of this little balsa wood box.


First thing I did was to cover the outside of the box with patterned paper from K and Company.  I used Mod Podge for this purpose.  As the paper is a heavy grade, I gave the box a couple of generous coats of the adhesive and also brushed it onto the paper itself so it would bond well to the wood surface and not peel off or bubble up when the box is opened.


After allowing it to dry completely overnight, I sanded the edges with my Tim Holtz distress sander to smooth them and get rid of any overhanging paper. I braided 3 lengths of gold elastic cording together to loop over the button closure.


The crocheted and Venice lace were glued to the underside of the flap  and the fancy trim on the topside using Aleene's Quick Grab Tacky Glue. the self adhesive flat-back pearl strip was then added .


I used 3 kinds of ribbons - a very narrow pink satin, a 1/4" cream organza and the 3/4" black and white stripe, with which I made 2 separate bows and tied them together with a 6" length of the striped ribbon.  This multi-strand bow was attached to the flap with Beacon 3-in-1 Advanced Craft Glue.  I also used the Beacon glue to adhere the rose on top of the bow. The leaves were coated with Versamark and embossed with Metalline Green powder.


The flowers started as white mulberry paper by Recollections that I colored with Copics to coordinate with my color scheme and added flat-back pearls for centers. The butterfly was punched from a piece of patterned paper and the edges embossed with WOW Bubble Gum embossing powder. 


This flourish, which I stamped and embossed with Primary Ebony powder prior to covering the box added the perfect feminine element to the design. I added a few heat set crystals to the curlicues using my i-Rock.


I removed the button from the flap and coated it with Primary Ebony powder and heated it with my heat gun then stamped the little daisy in Versamark and embossed it in Metallic Gold Rich Pale Regular powder.  I added a rhinestone for the center.  Finally, I used E6000 adhesive to attach the typewriter key letters, spelling the word "LOVE" on the flap.

I hope you like my little box.  It's approximately 6" long and is the perfect size to hold a pair of those small reading glasses and sit on a bedside or end table.  Don't forget to see all the beautiful home decor items created by my teammates on the WOW blog.

That's all I have for you today. Thanks so much for stopping by. As always, your comments are welcomed and appreciated.  Until next time...

Happy crafting!
Anniebee

Thursday, May 31, 2012

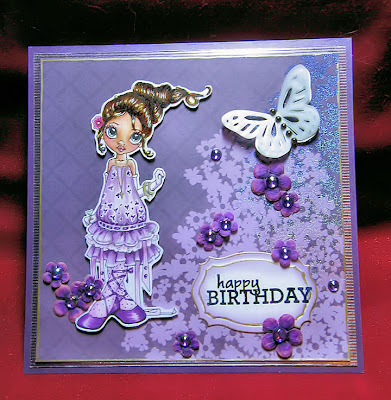
Happy Birthday!

Hi, everyone! I'm a little late posting today so I'll get right to it. I have another Saturated Canary card for you today (didn't I warn ya? LOL).

This little cutie is called "Priscilla Pie". I have used a monochromatic color scheme this time, with the primary color being various shades of purple. I making such projects occasionally though I really prefer using lots of color in my projects.


Adorable little Prissy is colored with Copics, of course! The patterned paper I used is from DCWV's Modern Bouquet stack. I used one of Martha Stewart's  punches to make the double layered butterfly in white cardstock and vellum and the greeting is stamped onto a label made using a Nestibilities die. The little flowers, which were originally white, are from Recollections and I colored them with 2 shades of purple Copic markers to coordinate with my design. The self-sticking rhinestones are also by Recollections. The "Celebrate" die cut was made on my Cricut machine.

I am entering this card in the following challenges:

TBD

That's it for today! I'm keeping it short and sweet for a change. I'll be back tomorrow with a clean and simple wedding card featuring yet another of Krista Smith's little lovelies. Until then...

Happy crafting!
Anniebee


Wednesday, August 17, 2011

Challenge #23 at Amber's Crafts and Stuff - Dollar Store Finds and a Digi Stamp

Good morning, Bloggers!

I'm thinking this is going to be a quick post as it's 4:30 AM and I haven't been to bed yet. I'm a night owl by nature but this is even past MY bedtime! Today is Wednesday again and therefore, it's time for another challenge at Amber's Crafts and Stuff. This will be my last project for Amber as she has decided that running a challenge blog is taking too much time away from her family. I'm a little sad about this news because hers was my very first design team and I have enjoyed working with Amber as well as my teamies over the past several months. My initial term would have ended in September anyway so it's really only a couple of challenges early, I guess. I'm still an active member of 2 other design teams, for The Outlawz and JustWords Stamps and I'll have a new project for JustWordz on Friday and one for The Outlawz on Saturday! Whew! Busy week!

Anyway, this week the challenge theme at Amber's is Dollar or Pound Store Finds plus our sponsor, Nikki of  Limited Runs Digis was kind enough to give us a digi to work with that we were supposed to incorporate into our projects. Well, after visiting 2 different dollar stores, I didn't find anything that really excited me and since I was using the digi, whatever I created had to be at least part paper or something that would work with a paper butterfly at least because the design I chose is a wonderful whimsical butterfly. What I ended up doing was buying a real cheap plain white jewelry-type gift box and altering the top of it. I created a pretty water scene by using a paper with a watercolor water pattern on it. This paper had been in my stash for ages so I don't know who made it or if it's even still available but I know I bought it at Jo-Ann's. I covered the lid in this patterned paper and used one of my Martha Stewart border punches to create a border to go around the lid of the box because I had not quite enough to cover the entire lid completely. I also added a strip of lace and ribbon (it came as one piece on a spool, also from Jo-Ann's) and some pearls that I tinted with my Copic marker #BG13 to add just a touch of bling.  I printed the butterfly provided by Limited Runs Digis and colored it with Copics, then put a thin coat of Golden's Pearl Glaze over it and a coat of Diamond Glaze over that.  The result was that it now has the appearance of a piece of Cloisonne jewelry! I love how it turned out. Well, the box was still waaay too bare for my liking so I printed a couple of water lili digis that I aquired from Sweet Coloring Pages in different sizes, colored them up with Copics and coated them with the Diamond Glaze as well. I was almost satisfied but not quite. You see, I'm a "more is more" kinda girl so I just can't leave well enough alone most of the time unless I really try hard. I added 4 corner pieces that came in a package of K & Company 3D chipboard embellishments and a dragonfly, also from K & Company, that I thought went pretty well with the butterfly. I popped all the elements except for the smaller water lily and the corner pieces up on Pop Dots to give it some dimension.  It was really starting to look like something now! I had some mini Scrabble tiles and used them to create a title, or greeting if you prefer, for my project and I was done! Here it is...


I can't say this is my all time favorite project but I think it turned out rather cute!  I hope you like it.  Please feel free to leave a comment if you wish.  I love reading your thoughts, opinions and suggestions.  Thanks so much for stopping by today and I'll see you back here on Friday with another project for JustWordz (unless I can muster the energy and creativity to make something tomorrow).  I hope you all enjoy your Wednesday and the rest of your week.  Until next time...

Happy crafting!
Anniebee