Showing posts with label WOW Embossing pen. Show all posts

Thursday, February 21, 2013

Wow Embossing Powders DT Card

Hi, everyone! Another week is almost gone and this week, I'm really ready for the weekend to get here. I started a new position and it requires that I be there early so I have been leaving home around 6:30 to make sure I'm there early. I have gotten up at 5 the last two mornings and it's kicking my behind because I am not a morning person at ALL! That makes it a little tough to sit through 8 hours of training but so far, I'm managing okay.

I posted this card on the WOW Embossing Powders blog a couple of days ago but have been so busy, I'm just now getting around to posting it here. I'm a little tired tonight so I'm not going to dilly dally. Here's the card and the information I posted on the WOW blog:

Hello, WOW fans! Anne here with a greeting card I made using my favorite of all the WOW Embossing Powders, Metallic Gold Rich Pale Regular. As my focal point, I used a lovely digi stamp created by Rick St. Dennis. Being completely enamored of turn-of-the-century fashion, I knew I had to color this image the moment I saw it. You know how some images or colors or designs just speak to you? Well, this was one of those things for me. If there is anything I love as much as heat embossing on my projects, it's coloring with alcohol inks.

Anyway, I'd like to share this little card with you today. As you can see, I used the gold embossing powder on my greeting but I also used the WOW Embossing Pen on the flower shapes around the frame to color them gold as well as the earrings and brooch, which on which I used the Clear Gloss Super Fine Embossing Powder to give them the look of crystal and onyx. In addition, I pressed the edges of the image, which I die cut with a Spellbinders die, into my embossing pad and dusted them with the same gold powder. I used it again on the inside sentiment. The gold powder just fits so well with many of my project designs and has become my regular "go-to" powder, especially when I'm making cards.


With Spring just around the corner, I'm looking forward to warmer weather and flowers in bloom. It's almost time to start those  St. Patrick's Day, Easter and Passover cards and gifts too. Look for lots of inspiration for your springtime projects right here in the coming weeks.  Thanks for stopping by today! I'll be back late tomorrow to show you the card I made for my son's birthday. I didn't want to post it before I gave it to him for fear he might stumble across it here. Until then, have a wonderful Friday and ...

Happy crafting!
Anniebee


Tuesday, December 18, 2012

A Little Break From Christmas Crafting

Hello, all of my wonderful readers! Christmas is upon us, being only a week away. It doesn't seem to matter how early I get started on my holiday crafting, I always manage to run right down to the wire every year! Maybe I subconsciously pace myself to finish up at the very last minute, or maybe I add to my to-do list without even realizing it. For whatever reason, I will probably finish up around midnight on Christmas Eve. LOL

I was commissioned to make Christmas cards for a friend's niece to give to her young children this year. She picked out a digi stamp from Saturated Canary for her daughter, who will celebrate her first Christmas this year, and a free Mickey Mouse coloring page for her son. I'll post them as soon as I know she has received them as I had to mail them to her in Michigan and I don't want to put them on my blog until after she has seen them. That just wouldn't feel right to me, even if she never saw them on here.

Well, I enjoyed coloring that SC image so much that I decided to do it a second time in a different color scheme for my December design team project for WOW Embossing Powders. The first one was done in traditional Christmas colors but for this one is, as you will see, I used soft baby colors. The digi is called Butterfly Baby and can be purchased in Krista's shop. Even though I used both pink and blue, I made pink the dominant color in the design, leaning more toward a baby girl than a boy.


As much as I enjoy crafting for the holidays, I was ready for a short reprieve from it. The funny thing about babies is that they arrive when they want to, regardless of what the doctors think (unless, of course, they are subject to scheduled C-section delivery). So the blessed event could just as well happen on Christmas Day as any other day, which means that this project is not really "out of season" as I see it.


I used only 2 WOW Powders on this card. The main one was Opaque Bright White Regular, that I used on the letters making up the word "BABY" and also on the sentiment on the inside of the card. I stamped BABY onto light pink cardstock, heat embossed it and then cut the letters apart so that I could mount them onto squares to resemble building blocks.


I used a RV02 (Sugared Almond Pink) Copic marker to color in the top half of each letter and that little bit of extra color really made the white outline pop and added some extra contrast. It doesn't show up very well in the photographs but I also used Neutral Ultra Shimmer powder on Butterfly Baby's cute little wings. It really makes them sparkle!


I think the paper is by K and Company but I don't recall the name of the stack. I love the pink/blue combination with just small pops of sparkly red here and there. I used a single blue rose and several baby pink Sweetheart Blossoms from Wild Orchid Crafts.


Below is a shot of the interior of the card, showing the sentiment embossed in the same Bright White powder. I attached the image, flowers and letter blocks to the right panel of the gate fold rather than the left because I wanted the flowers anchored securely instead of hanging off the edge as they would have been if I had attached to the opposite side.


I also traced around the left half of the image mat and letter blocks, then cut a shadow mat to go underneath them to give some extra support. This worked out quite well and is very stable.


Then I added 3 pink pearls to the upper right corner to balance the design.  That's it for today. Drop by the WOW Blog for more inspiration from my extremely gifted teammates. I have linked this card at the following sites:

Through the Craft Room Door - #49 Anything Goes
Artistic Insirations - #20 Anything Goes

I'll be back in a couple of days with some more Christmas-inspired goodies for your viewing pleasure. Until then...

Happy crafting!
Anniebee

Saturday, November 10, 2012

New Year's Eve Party Invitations using WOW Embossing Powders

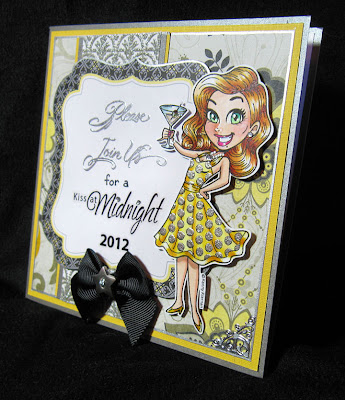
Hello, friends! Happy Saturday to you! I hope that by now you're giving some serious thought to planning your holiday-themed projects. Every year, the big 3 (Thanksgiving, Christmas and New Years) creep up on me and I always have to rush around to complete my craft projects in time for gift giving, party planning or what have you. Well, when my WOW team leader, Jen, asked us to use non-traditional colors to create holiday projects, I felt a little trepidation because I am a confessed traditionalist when it comes to holidays, especially Thanksgiving and Christmas. My family grew up with traditions passed down from relatives who are no longer with us and we added a couple of our own to the mix as well.  Jen also asked for a volunteer to tackle New Year's Eve party invitations and after thinking about that for a split second, I jumped at the chance! That would allow me to comply with the assigned theme without forcing me too far outside my comfort zone with regards to traditional Thanksgiving and Christmas fare! So I set about the task of choosing a non-traditional color palette with the aide of some suggestions from Jen.  I chose yellow, grey and white but I added a couple of other colors (silver and black) to the mix and came up with what I think is a pretty cute design for my hand crafted invitations.  See what you think. I'll even give you the basic instructions for making your own invitations just like them.


The cards are 6" square and made from DCWV Shimmer cardstock in a silver/pewter shade. The papers are from DCWV's Lemon Flower stack and the digi stamp, by Kenny K, is called Happy Hour which is available for purchase here. I hand colored the image with Copic markers and used my WOW Embossing pen and Metallic Platinum Sparkle to create the glittery effect on her polka dotted dress and Neutral Ultra Shimmer and Clear Gloss Regular for her martini glass. Then I colored her beads with silver gel pen and attached tiny rhinestones for her pendant and earring.


It wasn't easy coloring 5 identical characters but I think they are close enough that one would have to study pretty closely them to see the variations between them.


I found the cute little placards in the do-it-yourself invitation section at Michael's but they would be fairly easy to create with a die or die cut machine and coordinating patterned paper to match your own design in any color. I used a generic stamp and Metallic Silver Regular on the "Please Join Us" and "Kiss at Midnight" and "2012" are stickers. I used a black gel pen to print "for a" because I had no stamps to use for that part. I thought it would be fun to give my soiree a title that I can use each year and when I found the New Years sticker set, I knew Kiss At Midnight would be perfect! Isn't it nice with things just seem to fall together so easily?


In keeping with my tendency toward the traditional, I included a large clock in my design made from Tim Holtz's Sizzix Bigz die called "Weathered Clock" that I embossed with WOW Black Glint powder.  I traced the outline of the clock on cream cardstock and cut just inside the lines to make the background and then distressed it and stamped and colored the center design where I would be attaching the hands. The banner and party details are embossed with Metallic Silver Regular  and outlined with silver gel pen. I added rhinestone accents at each hour on the clock to give it a bit of bling. After all, New Years is all about glitz and glam, right?


I added a bow of black grosgrain ribbon with silver star buttons attached with sparkly silver cording as a finishing touch. I have included several close-ups to show the details more clearly.


Sooooo... are you ready to tackle your own set of party invitations now?  I encourage you to try it.  Once you get on a roll and get a rhythm established it really doesn't take that long to do.... unless you're inviting a large number of guests, that is! LOL 

Please stop by the WOW Blog to see the other non-traditional holiday projects created by my teammates.  I'm sure there is something there to inspire you even if you aren't up for making invitations. That's it for today but I'll be back tomorrow with another new project for Kenny K's Krafty Krew so I hope to see you then. 

I am entering these cards into the following challenges:

One Stop Craft Challenge - Anything Goes
Sweet Stampin' Challenge - Anything Goes
Fat Pages and Cards - #26 Anything Goes
Pause, Dream, Enjoy - #45 - Food & Beverage

Happy crafting!
Annibee