Hi, everybody! I'm so sorry not to have posted anything new in the past several days but you'll see in a few minutes why that was. I have been a busy crafter despite the fact that I didn't show you what I have been working on before now. This week at
Amber's Crafts and Stuff, the designers were tasked with creating projects using a technique we have never used before! Well, even if you have been crafting as long as I have you know that, along with the constant influx of new products and tools, there are always new techniques being devised to create new and different results so that I had a plethora of untried techniques from which to choose.
I know I have said this a few times before but since I have a number of new followers who are most likely unaware, I will tell it one last time. I lost my job in August of last year after my company was sold and the new owners laid off over half of my department plus 125 other employees throughout the company. That was quite devastating to say the least because I had been with the company almost 15 years and had aspirations of retiring from there in a few years. Needless to say, I have been searching for a new position since that time and have, as yet, been unsuccessful in that endeavor. They say that every cloud has a silver lining and even though I had to look really hard to discover it, I found that my situation is no exception. Aside from not having to wake up at 6 every morning for the time being, the other good that has come out of this unfortunate situation is that I have learned to make do with less and I have also become more creative in my crafting. Luckily for me (take heed, paper and ribbon hoarders, everywhere!), I had accumulated a little bit of a stash of scrapbooking papers, stickers, ribbons and other goodies before I was let go so I have been able to stay busy with my paper crafting while I have been sitting at home, looking for a job and trying not to use any more gasoline than I absolutely have to. This has resulted in an ever-growing greeting card collection along with a few mini albums and altered, repurposed or recycled projects.
I have also learned some new techniques... how timely, right? LOL! Those who have been following me regularly for a while are aware of my love of flowers and boxes. Well, let me tell you, in case you didn't already know, that living on unemployment with no additional income allows little to nothing in the household budget for crafting supplies! As I stated, I have a decent stash of tools and materials but the way things have been going so far, I decided that I had better learn to stretch that stash as far as I can because it may take quite a while longer to find a new job. Soooo.... I learned to make my own paper flowers! Mostly I have been teaching myself to make roses because I use so many of them and they are one of the most difficult types to make yourself. It took a few tutorials and a lot of practice but I think I have successfully gotten the technique down pat. At least, I think so. That's not to say that my personal technique can't be improved upon or that it won't evolve to some degree going forward but for now, I'm very happy with the way they have been turning out.
Despite my somewhat futile attempts to de-clutter, I have been hanging on to the most wonderful box for about 3 years, planning to do something spectacular with it but not sure exactly what I wanted to do. This box was received as a Christmas gift from one of my company's outside counsel and originally it contained the most delicious Belgian chocolates from a confectionery named Gudrun. The box measures 10 1/2" x 8" x 2 1/2" and opens on the front in the middle, sort of like a gate-fold card does. It's really cool and I have not seen another one like it since I got it. It also came in its own sturdy gift bag which I also saved and will do something with later.
I completely covered every surface of the box with different scrapbooking papers and cardstock and decorated every side but the back (or bottom in this case) with Copic markers, pearls, flowers, bling and butterflies. I LOVE the way it turned out and now I have not one, but two boxes to hold my greeting card stash. How great is that?! There are several pictures (nothing new there, I know!) so get comfy and grab a beverage of some sort. My hope is that you'll be interested enough to make it through to the end of this lengthy post.
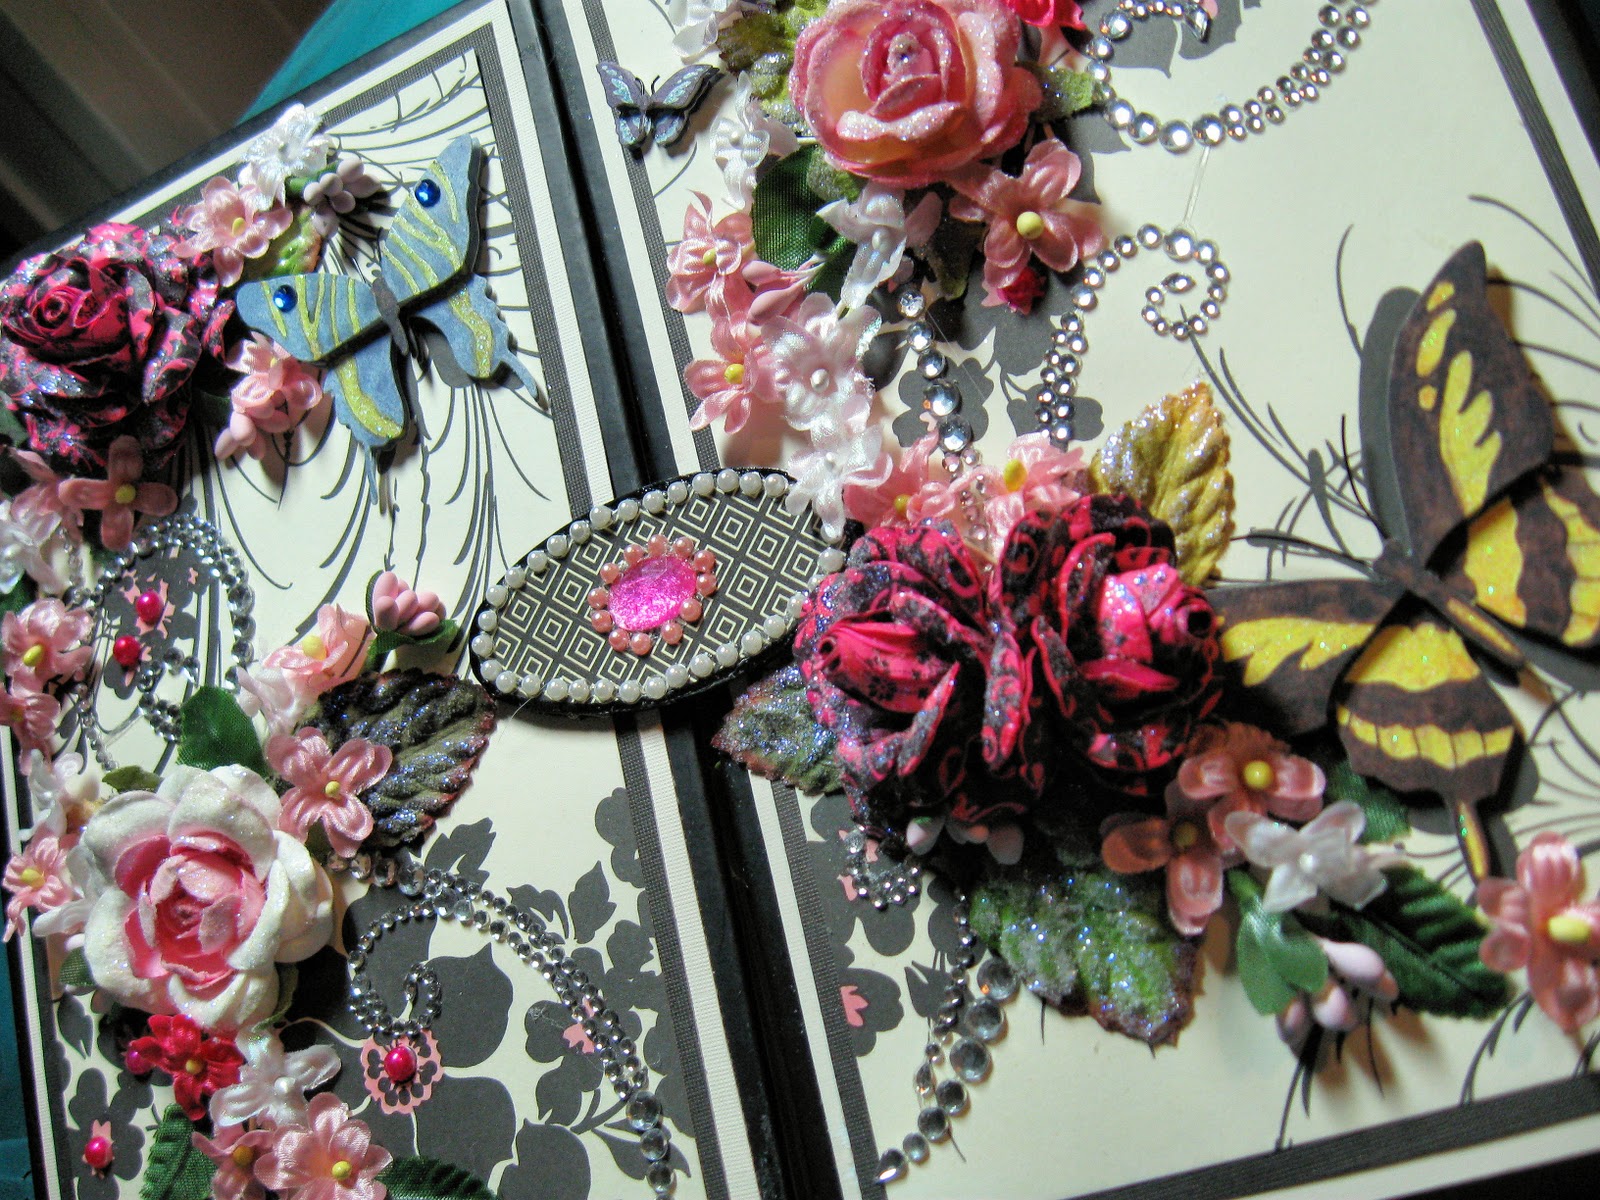
My Butterfly Garden
The dark pink and black roses in the upper left and bottom right corners are the roses I made with my own nimble fingers. The others are some I bought at Michael's. The next couple of pictures illustrate how the box opens. The oval-shaped tab in the center has a magnet embedded in it that holds the box closed when both "doors" are shut.
I couldn't decide whether to line the inside of the box with some pretty pink paper but since it's very clean and in great shape I decided to save my paper for a better use. I really am becoming quite frugal, aren't I? If you'd known me BU (before unemployment), you'd realize that's not my nature! Heh heh!
All of the butterflies are by K & Company, from the Susan Winget collection. The blingy swirls are by Say it with Crystals.
The Recollections pearls, which were originally pale pink, were colored with Copic maker RV 09. The black and cream DP I used on all sides but the back is from an 8 1/2" square paper pad by K & Company simply called Black and Ivory. There are some gorgeous patterns in this pad. After I punched out my flower shapes, I colored the pieces with one of my Copics, RV06.
This paper I used on the back was a 12" x 12" sheet from a pad of textured cardstock I got at Michael's on clearance for $1.49! I love the damask diamond pattern on this one.
The box will hold all of the cards I have made right now, which total 13. It will hold a lot more if they aren't as 3-dimensional as I make most of my cards.
Here are some of the other roses I made while I was working on my technique. I used double-sided cardstock for all of the flowers in the next 2 photos. You can use single-sided paper too if you don't mind the white showing or if you color it with something that won't bleed through to the other side.
You can see the delicate patterns on the paper if you click on the pictures to enlarge them. Almost all of the papers I used are from various collections by K & Company. Que Sera Sera is one of my favorites as the patterns are smaller and more colorful.
The green roses in the bottom left corner are the first ones I made. Single-sided paper from Basic Grey's Lime Rickey stack was used for these. The tiny ones were something of a challenge to make when I first started out but became easier as I became more adept. If you click on the picture, it will enlarge so that you can see the white paper on the inside of the tiny blossoms. There is one oddball dogwood-type blossom I made with some of the leftover flower shapes.
I used a combination of techniques but for the most part, I credit one of my favorite blogs,
Dana's Inspirations. Dana's You Tube tutorials (you can find a link in the right sidebar of her blog) are entertaining as well as educational and she demonstrates several different types of flower making techniques in her 3-part series. The next technique I want to try is rolled ribbon, felt and tulle flowers. I don't think they take as much time to make and they appear at first glance to be easier to learn. Check out Dana's blog if you get a chance and if you do, let her know I sent you.
I hope you enjoyed seeing my project. Stop by
Amber's blog to see the wonderful projects created by the other design team members. They're sure to inspire you to join in the fun and try a technique you have been wanting to learn. Thanks for visiting me today!
I have entered this project into the following challenges:
Happy crafting!
Anniebee
.jpg)
.jpg)
.jpg)
.jpg)
.jpg)
.jpg)
.jpg)
.jpg)