I thought I would share with you today a book card I made for publication in "Through The Craftroom Door", an online paper crafting magazine. I was asked by the publisher, Colleen Holmes, to do a special project for the magazine and this was what I chose to do. This post is quite graphic intensive so I hope you'll make yourselves comfortable before you begin. LOL!
Book Card Tutorial
I adapted this cool technique from a video tutorial I found
on You Tube by added my own special touches to make it sturdier and
more durable. My version actually
looks like a real book until you open it and see the inside.
Supplies needed:
2- 12”x 12” or 4- 8.5”x 11” sheets of cardstock in white, cream or light beige
Distress,
chalk or pigment ink pad (I use Quick Quotes Powderpuff Chalk Ink)
Patterned
paper that conveys the theme/title of your book (I chose Graphic 45's Fashionista Collection, which I believe has been discontinued now).
Light or medium-weight
chipboard
Mod Podge,
white glue and Beacon’s 3-in-1 Advanced Craft Glue (or comparable products)
Paper
Trimmer
Scoring
Board
Wide duct tape or masking tape
Scissors
Embellishments
of choice (i.e. lace, ribbon, pearls, rhinestones, brads, paper or silk flowers, die
cuts, photos, embossing powders, markers, etc.)
Instructions:
You'll need 2 sheets of 12" x 12" or 4 sheets of 8.5" x 11" cardstock. This will make the pages of your book card. I use a light beige color to make the pages of my book look like old paper. Cut 2 pieces of cardstock (the cheaper the better) 11 or 12 inches by 6 inches and 2 pieces of the same cardstock 11 or 12 inches by 4 inches. The length will depend on whether you use 12x12 or 8.5x11 cardstock. The extra inch will make your book look just a tad thicker but it’s not really enough to matter.
You'll need 2 sheets of 12" x 12" or 4 sheets of 8.5" x 11" cardstock. This will make the pages of your book card. I use a light beige color to make the pages of my book look like old paper. Cut 2 pieces of cardstock (the cheaper the better) 11 or 12 inches by 6 inches and 2 pieces of the same cardstock 11 or 12 inches by 4 inches. The length will depend on whether you use 12x12 or 8.5x11 cardstock. The extra inch will make your book look just a tad thicker but it’s not really enough to matter.

Score each piece every ½ inch across the shorter
side, as pictured below.
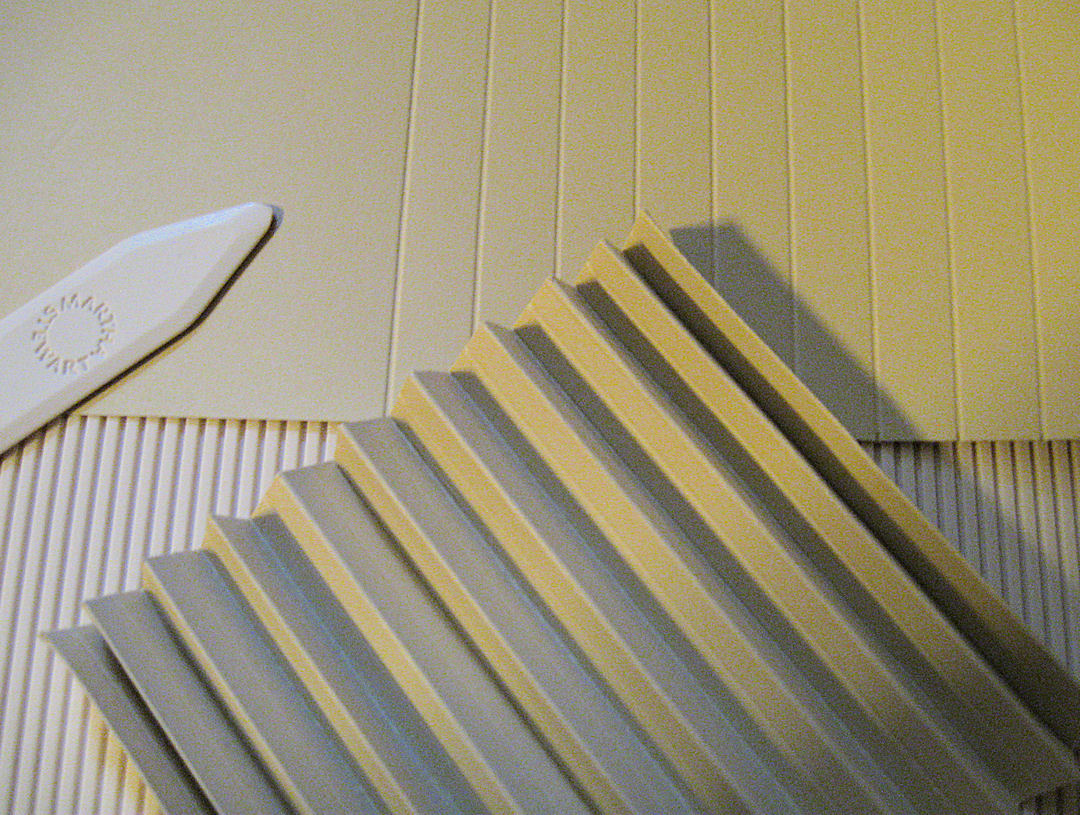
After all 4 pieces are scored, fan fold each piece using a bone folder to enhance the creases as you go. When this step is complete, you should have 2 pieces that are 0.5’ x 4” and 2 that are 0.5” x 6”.

Prior to assembling the pieces, ink both of the edges of each piece with distress ink or any kind of tan ink pad. My preference is Quick Quotes Powderpuff Chalk Ink in Mocha Mama . You can also apply a gold embossing powder, gold gel pen or gold leaf to the outer edges. Doing this will give your “pages”the appearance of gilded gold as many of the antique hard bound books had. I think it kind of depends on the kind of book card you’re making.

The next step is the most difficult of the entire process. You must interlace one short side and one long side together to form one corner of the book. You can use either regular glue or an adhesive tape like the ATC tapes to accomplish this. There are good and bad about both methods. The tape method is not very forgiving so there is little room for adjustment once the sections are stuck to one another. Glue, on the other hand, is more messy but does allow for some degree of adjustment if you work quickly before the glue starts to dry. If you use glue, try to work quickly but don’t rush so much that your adjacent pieces do not form a good 90 degree angle when you’re finished. Repeat this step to form the opposite corner.

Now you have to put the two pieces you have just created together to form the pages section of your book. Do the same thing as you did in the last step to join the two pieces on the opposite corners. Now you should have a full rectangle that measures 4” x 6” and approximately 1.25” deep.


Next we'll make the cover for the book. First, two pieces of chipboard 4.25” x 6.25” and one piece 6.25” x 1.25” (or however deep your pages are. This measurement may vary slightly each time so it’s always best to measure before you cut the spine section for your cover.

Placing the narrow piece between the two covers, use duct tape or wide masking tape to join the three sections of the cover together, leave a very slight space between the sections so the cover can fold without causing a bind.


If you haven't already done so, now's the time to choose the theme for your book and the papers for the outside and inside of your cover. You’ll want to choose papers
that compliment your theme and look something like an actual book cover. The papers I chose for this project are shown
below. The dark brocade paper (from
DCWV’s “Lemon Flower” stack) will be the outside cover and the red paper with
the cherries on it (from Graphic 45’s “Fashionista” collection) will be the
inner cover. Cut the paper to make your
outer cover to 7.5” x 11”, making sure that you cut it so that any pattern will
be centered on the cover.

Using a craft mat or butcher paper to keep from making a mess on your work surface, apply a think layer of Mod Podge or any liquid adhesive that doesn't dry very quickly to the back side of your cover paper and lay the chipboard pieces down on the paper. Press down on the chipboard to insure a good hold. I don’t recommend using snail adhesive to adhere the paper to the cover because the paper needs to be firmly attached to the chipboard and that just can’t be accomplished with snail adhesive.

Turn the cover with the paper attached over and smooth the outside, eliminating any wrinkles. Turn it back over and brush adhesive on the overhanging edges. Fold the corners in first, then the long sides and finally the short sides until all the overhanging edges are folded to the inside of the cover. Allow to dry.


HINT: It helps to fold the chipboard book cover as you as you apply the paper to the outside so that when it’s dry and you fold it into the correct book shape, it doesn’t stretch and tear your paper at the spine, as it will when it’s attached too tightly over the chipboard pieces. You may want to make the cover in 2 separate steps, allowing the cover paper to dry before applying the strip on the spine to prevent problems when folding the cover after the glue dries.
If you wish, you can cover the spine of your book
with a coordinating paper. If you decide
to do this, cut a strip 2.5” to 3” wide and 7.5” long. Apply Mod Podge or your
adhesive of choice on the strip and adhere it to the spine on the outside,
folding the overhanging ends to the inside.
Cut the paper for the inside cover to 9.75” x
6”. Check to make sure that the piece is not too large. You’ll want to see about ¼” of the cover
paper all the way around on the inside of the cover. Brush on an ample amount of Mod Podge or
other liquid adhesive on the back of the paper and place on the inside of the
cover so that only about 1/8” to ¼” of the paper from the front side shows all
the way around. Press paper down firmly
and roll a brayer over it several times to form a good bond, wiping with a damp
(not wet) paper towel any excess glue that may be squeezed out during this step
. Place the cover between 2 pieces of
wax paper and lay something flat and heavy on top of it and allow it to dry for
several hours. This will prevent any
warping of the cover.
When it's dry, carefully fold the cover at the
creases, making sure that there are no places where the paper isn’t stuck well
to the chipboard. If you find any such
places , use regular white glue to stick them back down and press in place with
your fingers until it holds well. It
should look something close to the photo below.

Next, cut a strip of of heavy paper or light cardstock 6” long and about ¼” wider than the
width of your “pages”. Take your bone
folder and make a score line at ¼” and fold at the line. Use a very strong
adhesive like Beacon 3-in-1 Advanced Craft Glue to adhere the strip of paper to
one of the long sides of the pages section on the outside. Press into place with your fingertips being
careful not to push the paper into the folds of the pages. This covered edge will be used to adhere the
spine to the pages later. (See photo for Step 17.)
Choose the paper you want to show in the back of your book card. It will show through and should have something to do with the theme of your book. For instance, if you’re making a wedding or anniversary card, you might want to select paper that conveys that idea. Cut a piece of thin chipboard (I use empty cereal boxes or the backs of paper pads for this purpose) to just less than 4”x 6” and cut your background paper the same size. Adhere the paper to the chipboard and then adhere that to the back side of the pages section by applying adhesive to the flat back of the pages section.
The final step in creating the book form itself is to attach the pages section to the back cover/spine. Again, I use the Beacon’s 3-in-1 glue for this because it’s strong enough to hold together a project that will get as much attention as this one will when it’s complete.


Now, all the fun starts! All that’s left to do is
embellish, embellish, embellish… to your heart’s content. I add gathered vintage lace and ribbon to the
inside frame created by the pages. A
book label looks great on the front cover or on the inside of the cover. I’m a “more is more” kind of girl so this
type of project is right up my alley.

Shown below is my finished project. I have several more of these planned as future gifts for family and friends.


If you enjoy trying different techniques, and if
you haven’t tried making one of these book cards, I highly recommend it. They take a little more in the way of time
and patience than regular cards but I think the results are well worth the
effort and they make wonderful hand-crafted gifts for the special people in our lives.
I'm also including some photos of one that I created for my nephew and his wife, who were married a year and a half ago. They haven't seen it yet and I'm planning to give it to them for their 2nd anniversary. They're in Michigan right now so I'm not sure when I'll get to see them again. I just hope they don't visit my blog between now and then!

The two chemical lace flourishes and all of the ruffled lace on the inside are antique lace that I collected when I used to make antique reproduction porcelain dolls.


I'll put all of the information regarding their wedding day on the placard on the left inside page, including their names, the date, etc.

This would also be a great gift for the new mom, special birthday or graduate.
So there you have it! I hope you're all having a beautiful and blessed Thanksgiving, surrounded by family and friends. Don't forget to do whatever you can for those who aren't so fortunate or who can't spend the day with those who love them. My daughter-in-law and I baked banana, pumpkin and apple breads as well as pumpkin and pecan pies for the local fire station. We also sent a complete turkey dinner with my son to the rig so they could have their own little celebration offshore.
I am entering the top book card in the following challenges:
TBD
Until next time...
Happy crafting!
TBD
Until next time...
Happy crafting!
Anniebee
Fab tutorial, thanks for sharing.
ReplyDeleteHugs
Caz x
Anniebee, wow this is amazing. Love all the detail and pretty flowers. Thank you for sharing the tutorial. .. and thank you also for returning by last time as well :) Xxx
ReplyDeleteOMG! like WOW!!! flipping AWESOME! xx
ReplyDeleteWow. Outstanding paper engineering and design.
ReplyDeleteI'm going to pin it for future reference!