Friday, February 17, 2012

WOW DT Project - Birthday cards in Valentine's Day colors

Okay, so Valentine's Day has come and gone again.  But February is the month of love and I have a couple of cards I created for birthdays but I used the traditional colors of Valentine's Day!  Several of my family members have February birthdays so I was tickled pink to have received this assignment for the WOW Embossing Powders DT because it enabled me to accomplish two tasks at the same time.  That doesn't happen very often.

My first card was made in the typical red, pink and white color scheme.  It also contains many of the things I adore... butterflies, flowers, little girls with big eyes and polka dots! Oh, and how could I forget pearls?  This little sweetie pie is a digi stamp created by one of my favorite artists, Krista Smith of The Saturated Canary.  Krista sells her digis in her Etsy shop and some of her designs are also available in rubber through Simply Sassy/ Sugar Nellie.


The WOW Embossing powders I used on this card were: Cable Car Red, Metallic Gold Rich Pale Regular, Metallic Gold Rich Ultra High and Clear Gloss Regular. As you can see, I even embossed the fabric flowers and they look so cool with the gold tips on their petals.

My second card uses the slightly less traditional palette of pink purple and gold.  Once again, the image is from the pencil of Krista Smith.


I haven't quite decided on the sentiment for the inside but I have to make up my mind very soon as I plan to give this one to my niece for her birthday tomorrow.  The powders I used on this one were Earthtone Grape, Metallic Gold Rich Pale Regular, Metallic Gold Rich Ultra High and Clear Gloss Regular.  These powders are so much fun and I love experimenting to create different effects I get when I use different techniques on them.  For instance, to create the effect I achieved on the butterflies on the second card, I used the Grape powder on purple Shimmer Cardstock by DCWV and held my heat gun very close to it to cause the bubbles/ little white spots.  Then I applied Versamark to the outer edges of the wings and dipped them in the regular gold and then did the same thing with the Ultra High Gold and heated them as I normally do.  And isn't this little fairy just picture perfect?  The greeting was done with a glitter gel pen by me.

That's all I have for you today.  I'm working on some altered projects and have plans for a mini album as soon as I get the time to work on it,  I hope you have been participating in our week-long blog hop over on the WOW blog and that you're keeping up with leaving comments on all the designers' blogs to make you eligible for the prize or prizes that will be given away at the end.  Thanks so much for visiting.  If you like what you see, I hope you'll consider becoming a follower.  Until next time...

Happy crafting!
Anniebee

Sunday, February 12, 2012

Valentine's Day Wearable Art Created with WOW Embossing Powders

Hello, and happy Sunday to you all!  It's been a couple of weeks since my last post but for very good reason. As most of my regular followers are aware, I was laid off from my job in August 2010 after having been with the company 14 years and was unemployed for 18 months.  Well, I finally found a new job and I love it, even though I come home mentally and physically exhausted every day and by the time I finish my evening chores, I don't feel very creative.  That's not to say that I haven't done any crafting in two weeks though!  I have been lining up some new projects for the WOW Design Team and working on a couple of others plus birthday cards and gifts for some of my family members.

Today, I have a project I made for WOW using their fabulous... and I mean FABULOUS embossing powders!  My assignment, in conjunction with Valentine's Day was to create a piece of wearable art using the colors we associate with this holiday.  If you have visited the WOW blog, you saw the following sneak peak.
Well, to create this sweet pendant, I took two charms from a Tim Holtz's Idea-ology Adornments set that contained 8 charms and used the heart and the wings.  Here's the set, in case you're interested in making one of these for yourself or someone special.


Well, these charms are awesome as is, right?  Right!  But I wanted to add my own touch as well as some color (that's what embossing powders are all about after all) so I pressed the heart charm into my Versamark embossing pad and coated it well, then covered it in WOW Cable Car Red embossing powder from Suzy West's By the Sea Collection and heat set it.  That was better but the color was somewhat transparent so I repeated that step.  I could still barely discern the tiny dimples in the surface of the heart but the color was much richer and more opaque.  I wanted to add some gloss so I coated it twice more with WOW Clear Gloss powder and that did the trick!  After it cooled, I used E6000 Adhesive to attach the wings to the back of the heart and let that set overnight to form a permanent bond between the two metal pieces.  I added a jump ring and attached it to the chain.  And here's the finished project.


Then I took crystal hearts and bicone beads in red, pink and amethyst and made dangles for my necklace as well as a cute pair of earrings to match.  I really like how it turned out and it illustrates very well the versatility of WOW Embossing Powders.  You can use them on most non-porous surfaces and some porous ones, such as wood.  If you haven't tried them yet, you really should!  I'll be back later in the week with some birthday cards but be sure and check the WOW blog all week for wonderful projects by my design teammates.  Until next time...

Happy crafting!
Anniebee


Friday, January 27, 2012

An embossed bouquet

TGIF, everybody! Here we are at the end of another week. If the rest of the year goes as quickly as January has, 2013 will be here before we know it! Heaven forbid! It's supposed to be a beautiful weekend though and after the deluge we just had, albeit very much needed, sunshine and warmth is just what this girl needs to give her mojo a little push start.

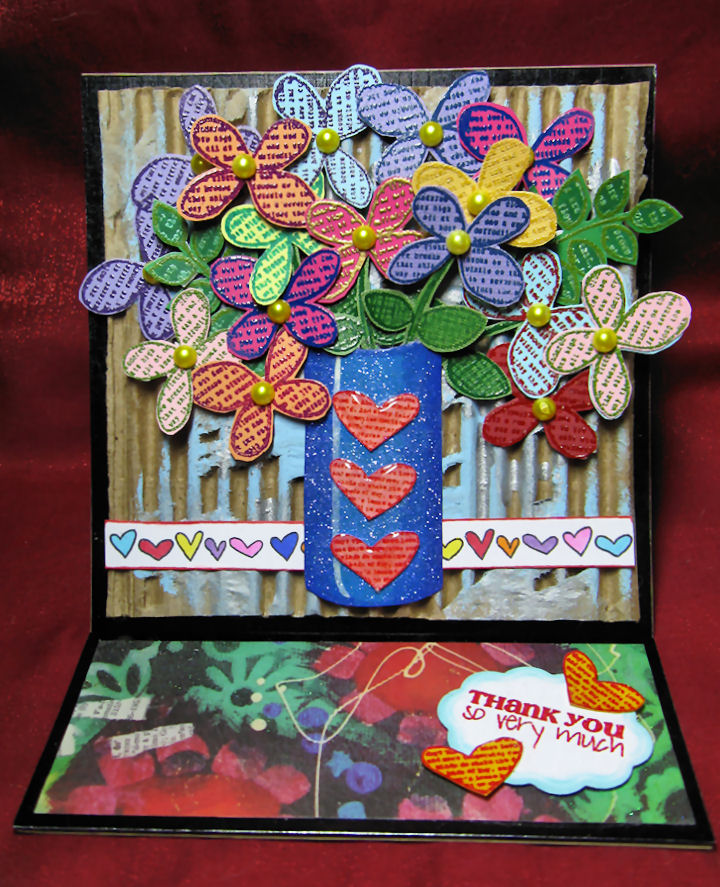
Today, I want to share with you my first card using WOW Embossing Powders! I have gotten so used to using primarily digital images on my cards, that I had almost forgotten how much fun it can be to design them using simple shapes and colors. That's exactly what I have done here. I used the WOW "Gratitude" stamp set to create this beautiful vase of flowers.


Each flower is stamped with embossing medium onto different colored cardstock and then embossed with contrasting colors of WOW Embossing Powder. I tinted some white flat-back pearls with a Y08 (Acid Yellow) Copic marker to create the flower centers. I embossed a few of the flowers with the stems in WOW Tea Garden Green on light green cardstock. Then Icut some of the other flowers out and glued them on top of the green flowers so that only the stem and leaves would be green.  I also embossed the leafy stem in Earthtone Olive on a dark green background.


I decided what shape I wanted the vase to be and free-handed it on a scrap of medium blue cardstock and used varying shades of darker blue to shade the outside edges to give the illusion that the vase was actually round. I coated the entire piece in Diamond Glaze and sprinkled it with Crystal Glitter.  To enhance the illusion, I used 3 layers of foam tape to raise the center of the vase and glued the outside edges to the corrugated cardboard I used as my background and to which I sponged a little sky blue and silver acrylic paint. I stamped the heart border stamp onto some white cardstock in Tuxedo Black Memento ink and colored the hearts with Copics in colors that coordinated with the flowers and edged the strip with a red Copic.  I also stamped the triple heart motif onto some pink cardstock, embossed it with Cable Car Red WOW powder and then cut them out and coated them with 2 coats of the Diamond Glaze to give them more dimension.


I used metallic black foil cardstock as a mat for the cardboard background and mounted that onto my 5 1/2" kraft base card.  But there's a little surprise that you may have guessed looking at the pictures.  This is actually an easel card!  Here's how it looks when the easel is folded down.


I cut a piece of 5 1/2" square smooth white cardstock to create the writing area inside the card and then matted a 5 1/2" x 2" strip of some coordinating designer paper, mounted it with foam tape to create the area to support the easel and a place to put my sentiment.  The "Thank You so very much" and cute heart stamps are also part of the Gratitude stamp set.  


As you can see from my photos, these stamps create crisp, detailed images, perfect for embossing or coloring with markers, colored pencils or other media.  The last little surprise is the definition of the word "Gratitude" that I stamped on the inside of the card as seen below.  When the recipient opens it up to read the giver's personal message, they'll see that definition.  I really love this stamp set, which has 3 additional stamps that I didn't use in the making of my card.


I really like how this colorful little card turned out and I can tell you that I'll be giving my Copics a bit of a rest now and then as more and more stamps are added to the WOW line.  I have seen a sneak peek of some of the ones that will be in the next release and I can tell you they are going to be FABULOUS!!  I want them all and can't wait to get my hands on them!

That's all I have for you today.  Please check out the WOW Blog and Facebook page to see the wonderful projects of my talented teammates.  And iof you're going to CHA, be sure to stop by the WOW booth and see their wonderful work in person.  You will be totally amazed at the versatility of these powders and stamps.  They'll help you take your paper crafting to a whole new level!  So until next time...

WOW Embossing Powder colors used:

Tea Garden Green, Bay Area Blue, Earthtone Olive, Cable Car Red, California Sunshine, Earthtone Paprika, Earthtone Blueberry, Earthtone Grape, Metallic Gold Rich Pale Regular.

Happy crafting!
Anniebee


I am entering this card in the following challenges:

TBD

Wednesday, January 25, 2012

Button It Up! Final Joy's Life Design Team project

As mentioned in my previous post, today will be my last post for Joy's Life Design Team and for this post I made a card using the ever-popular pirate theme.  Joy's fabulous You're So Punny stamp set was used for the greeting on the front of the card as well as the sentiment on the inside.  I have been planning to make this card for some time but somehow the theme never seemed to be appropriate until now.  We were asked to create something using buttons. I had this really cool-looking rectangular button that originally had a metallic copper finish and I coated it in WOW! Metallic Gold Pale Regular embossing powder and heated it with my heat gun.  It gave the button an entirely new look and it coordinated better with the cold accents I used on the card.

 This swashbuckler is straight from the imagination of Phee McFaddell, one of my favorite illustrators.


I'd like to thank Joy for her generosity and for giving me the opportunity to represent her stamp company during this fun and fantastic time that I have been a member of this very talented group of designers and our dedicated group leaders as well.  If you still haven't tried Joy's stamps, I don't know what you're waiting for!  You'll love 'em!

Please check back on Friday for my third project for the WOW! Embossing Powder Design Team and in the meantime, you might want to check out the WOW blog and facebook page.  There is a new project posted every day of every month on the blog.

Until next time...

Happy crafting!
Anniebee

Last project for Blog Quick Quotes

Hi, everybody!  It's hump day and also the day of my last post as guest designer for Blog Quick Quotes.  For this post I created another layout featuring a photo of my pretty niece, Kirsten.  The Julie Je T'aime papers by Quick Quotes created the perfect backdrop for this photo.  This line is my favorite of all of the Quick Quotes paper lines and the colors coordinate so well with the photo.


The beautiful flowers are from Petaloo and the butterfly and dragonfly die cuts are by K & Company. I'd like to thank the folks at Quick Quotes for having me as their guest this month and I wish them continued success in 2012.  Stay tuned for my last post for the Joy's Life Design team, which will be posted shortly.  Be back in a few...

Anniebee

Monday, January 23, 2012

Time Flies!


Hello, crafty friends! I can't believe it's Monday again already and not only that, it is also nearing the end of January already! Can you believe it's almost the "month of love"??? I sure can't!  I'm as pleased as punch to present to you my first layout using WOW! Embossing Powders and Stamps. If you have never used embossing powders, let me tell you that they add an extra special element to your designs and are more versatile than most people know. Of course, if you have been following this blog, you have likely discovered this fact already.
I used a diamond stencil template to create a background for my layout using black ink and WOW Clear Gloss Regular Embossing Powder. The first thing I did was to tape the template to the edges of the patterned paper I was using. I could have used Ebony embossing powder but I wanted the pattern to fade into the existing pattern on the right side of the paper so I needed to control the intensity of the color as I applied it.  I accomplished this by using a large sponge dauber to apply my ink and when I got to the center of the page, I didn't refresh the ink so that it faded out the farther to the right I went.


Next I took an older embossing ink pad that I didn't care if I ruined and applied it over the black I had just stenciled. I carefully removed the stencil template and applied the clear embossing powder, then melted it with my heat gun. Then I taped a clock template to the paper and with a sponge dauber and white and red acrylic paint, I stenciled parts of the clock pattern on top of the diamond pattern. After the paint dried completely, I used a black Copic multiliner to enhance the numbers on the clocks as well as the numbers randomly located around the page. I also sponged a little red paint on a couple of areas and used a brayer to smooth it out.


Once my background was finished, I laid the photo of my beautiful niece I was using and all the embellishments on top of it and rearranged them until I liked the way it looked. I also embossed a couple of leaves with some of the WOW Metallic Gold Rich Pale Regular powder and arranged them in with the flowers. I made the letter tiles out of some cork squares that I got from a glass shop. They were once used to separate the pieces of glass to keep them from bumping each other and breaking on the rack. I just love recycling/reusing ordinary things and incorporating them into my art!  If you look closely, you'll also see a tear strip from a FedEx box that I stripped the paper off of to reveal the corrugated interior and splashed a little red paint on it.


The finishing touch was the cute pocket watch I added.  It's actually a resin dimensional sticker by Jolee's and I found some angel wings in clip art form, printed them and colored them with my Copics. I then cut them out and adhered them to the back side of the pocket watch.  I folded some foam mounting tape about 4 times to create a wedge shape to securely support it and to elevate it above the surface of the page. This layout was so much fun to make and I can't say enough about Wow Embossing Powders.  You owe it to yourself to try one or two of the gorgeous colors it comes in.  I think you'll love them as much as we do!


So there you have it. I hope you'll visit the WOW blog and if you like what you see there, I invite you to become a follower so you can keep up with what all the mega-talented designers are doing. If you happen to be attending CHA, stop by the WOW! booth and say hello to Suzy West and the Design Team.  I wasn't able to attend this time. :o(  Thanks for stopping by today. I hope your week is off to a good start and that you'll find some creative time to do something fun this week.

Happy crafting!
Anne

Saturday, January 21, 2012

Heritage Layout for Blog Quick Quotes

Hello again, my crafty friends! It's time for another project for Blog Quick Quotes and this time I have chosen the Quick Quotes Just Jackson line for the heritage page I made to honor my father, whom I lost to Alzheimer's Disease in May of 2003, two years to the month after my mother passed away. He served in the U.S. Army during World War II and was deployed to far away places like China and India. He told us, his children, many stories of those days and taught us to count to 10 in Chinese. I think that was pretty much the extent of his foreign language skills.


My dad was proud of all of his children and worked hard as a third shift postal supervisor to provide for his family, allowing my mom to stay home and care for us.  He taught me to swim, to ride a bicycle, to roller skate and to defend myself. He coached my softball team and my younger brother's baseball team. He was a bit on the stubborn side and saw most issues in black and white but he was kind, understanding and he always put his wife and family above himself.

This little layout is to honor him and the man that he was. Please visit the Quick Quotes blog to learn more about how I created this layout as well as the supplies I used. I hope you'll join me again on Monday for a layout I made for WOW! Embossing Powders and I'll post my last project for Blog Quick Quotes on Wednesday, the 25th. This month has flown by so fast it's hard to believe that my time as QQ guest designer is drawing to an end already! I have thoroughly enjoyed every minute of working with their incredibly talented design team and their fabulous products. Thanks for stopping by. Until next time...

Happy crafting!
Anniebee