Showing posts with label altered box. Show all posts

Saturday, July 7, 2012

7 Girls and a Smoking Gun Team post at WOW Embossing Powders blog

Whew! What a title, huh?  Well, the WOW design team is quite large and as such, it's broken down into smaller groups of 6 or 7 designers.  My group was originally called 6 Girls and a Smoking Gun but we recently added a new team member, Donna O'Leary, so of course our name had to change to include her. Each Saturday one of the teams is showcased on the WOW blog and this is our week.

Please visit the WOW blog to see the lovely projects my talented heat-gun-toting teammates have created.  Here is my project. I have included lots of pictures to show all the detail of this little balsa wood box.


First thing I did was to cover the outside of the box with patterned paper from K and Company.  I used Mod Podge for this purpose.  As the paper is a heavy grade, I gave the box a couple of generous coats of the adhesive and also brushed it onto the paper itself so it would bond well to the wood surface and not peel off or bubble up when the box is opened.


After allowing it to dry completely overnight, I sanded the edges with my Tim Holtz distress sander to smooth them and get rid of any overhanging paper. I braided 3 lengths of gold elastic cording together to loop over the button closure.


The crocheted and Venice lace were glued to the underside of the flap  and the fancy trim on the topside using Aleene's Quick Grab Tacky Glue. the self adhesive flat-back pearl strip was then added .


I used 3 kinds of ribbons - a very narrow pink satin, a 1/4" cream organza and the 3/4" black and white stripe, with which I made 2 separate bows and tied them together with a 6" length of the striped ribbon.  This multi-strand bow was attached to the flap with Beacon 3-in-1 Advanced Craft Glue.  I also used the Beacon glue to adhere the rose on top of the bow. The leaves were coated with Versamark and embossed with Metalline Green powder.


The flowers started as white mulberry paper by Recollections that I colored with Copics to coordinate with my color scheme and added flat-back pearls for centers. The butterfly was punched from a piece of patterned paper and the edges embossed with WOW Bubble Gum embossing powder. 


This flourish, which I stamped and embossed with Primary Ebony powder prior to covering the box added the perfect feminine element to the design. I added a few heat set crystals to the curlicues using my i-Rock.


I removed the button from the flap and coated it with Primary Ebony powder and heated it with my heat gun then stamped the little daisy in Versamark and embossed it in Metallic Gold Rich Pale Regular powder.  I added a rhinestone for the center.  Finally, I used E6000 adhesive to attach the typewriter key letters, spelling the word "LOVE" on the flap.

I hope you like my little box.  It's approximately 6" long and is the perfect size to hold a pair of those small reading glasses and sit on a bedside or end table.  Don't forget to see all the beautiful home decor items created by my teammates on the WOW blog.

That's all I have for you today. Thanks so much for stopping by. As always, your comments are welcomed and appreciated.  Until next time...

Happy crafting!
Anniebee

Friday, July 1, 2011

Asking for your help... (UPDATED)

This will remain on top until voting ends at midnight on June 30th.  Thank you in advance to all of my followers and visitors for voting for me and hopefully for helping me win this contest.  I'll be forever grateful for your help!  Please scroll down to see more recent posts.

6/30/11 UPDATE:  I'm sorry to have been MIA for a couple of days.  I have been consumed by this contest I'm in and trying to recruit people to vote for me.  There is one other entry with which I am competing for the prize.  As of 12:54 today, I am trailing by 6 lousy votes!!!  If any of my followers can help by posting a link on your blogs and asking your supporters to help out a fellow crafter, I would be forever grateful.  As I said before, if I win, I promise to post some blog candy to celebrate!  Here is the current link to my entry.  When you access the contest site, a message may be displayed asking for access to your computer.  This is only to verify that the vote is coming from a real person with a real email address and not some automated voting machine.  It doesn't collect personal data.  Then just click on the vote button and you're done!  Trust me when I say that I wouldn't ask for this big a favor if it wasn't important.  That prize money will help me pay some bills while I continue to look for a job.  Thanks so much for every one of you who is helping me.  This is a special community and I'm so proud to be a part of it.  Voting ends at midnight tonight and I'll post the outcome as soon as I know what it is.  Thanks so much and have a safe and happy 4th!  


Good Monday morning, friends!

I don't have a new post up yet (that will come later in the day) but in the meantime, I'm asking for your help. I recently entered a contest with Oriental Trading Co. called Get Crafty and the voting phase has just started.  The grand prize is $1000 Visa gift card!  I don't think I have to tell you what that kind of money would mean to someone who has been out of work for 10 months!  Being single and the sole provider for my household, it's been a long dry spell and even with my diligent searching, I'm having a very hard time finding a new job.  Even though unemployment benefits have kept me in my home so far, it just isn't enough to cover all the household expenses and with summer electric bills hanging over my head, winning this contest would provide a few months reprieve while I continue searching for a new position.  I don't like to dwell on the negative, as I believe things happen for a reason, but I'm beginning to worry a bit that I haven't even received an offer after all the applications I have submitted and interviews in which I have participated.

Anyway, I am asking for your votes on my entry to this contest. It's a project that I posted on my blog some time back and it's one of my favorite creations. There are pictures on the contest entry page but if you're interested in the details and lots more pictures, you can see it here. It shouldn't take but a minute of your time to cast your vote and I would truly appreciate your support.  I'll provide a direct link to my entry to make it super simple for you.  Here's a picture just to show you what you'll be voting on.


Click here to be transported to my entry.  Again, I appreciate your help and support very much.  If I happen to win, I promise that I'll post blog candy to celebrate! Thank you and have a wonderful day!

Please Note:  I have been contacted by a couple of my blogger friends saying they had problems accessing the voting page.  I just wanted to let you know that the contest is on Facebook and you have to have a Facebook account to be able to vote.  If you have problems getting the page to load, check your settings.  If you're in secure mode, turn that off temporarily and turn it back one after you have voted.  I apologize for the confusion and any inconvenience this may have caused you if you tried to vote and couldn't.  I have tested the link and it seems to be working fine for me so let me know if there are any issues other than these.

Blessings,
Anniebee

Wednesday, May 25, 2011

Challenge #11 - Something Vintage

Good morning, everybody!  I have good and bad news to report today. First the bad news... my computer crashed Friday evening and I spent the entire weekend restoring it! What a pain in the patootie! That has never happened to me before so I had no idea what all was involved in doing a complete restore. Thank goodness I had saved almost everything on a backup drive that updates automatically on a periodic basis. It just takes a very long time to reformat the computer hard drives and then to reload software, like MS Office, internet/virus protection and photo editing software, not to mention restoring all the files. But I'm back up and running faster and smoother than before so perhaps it was a blessing in disguise.

Now, for the good news! Challenge #11 at Amber's Crafts and Stuff starts today and this week the theme is "Something Vintage". My project was actually completed a while back, when I made a similar box for a blog hop I participated in. This is not really vintage in the antique or shabby chic sense of the word but more in style and feel.  This was a "naked" wooden box I found in the dollar bin at Michael's several months ago. They had only two left of different shape and I was intrigued by them enough to buy them both.  I thought they would make wonderful altered projects but I had no idea how they would look when I was finished. There was no definitive plan for them until I actually started working on them. There was just something about these little boxes that screamed vintage to me.  I wanted them to be similar in feel but very different in color and overall appearance yet both had to have that old-fashioned feeling to them. If you'd like to see the first one, you can find it here. I haven't made a card to match the second box but that may be something I'll do in the future.

This box is much brighter in color with it's gold, orange and hot pink. It "feels" kind of art deco to me and it, like the first one, is the perfect size to hold a pair of reading glasses. I think it would look very nice on a bedside table or sitting on a coffee or end table in a shabby chic bedroom or sun room, even though it's not really shabby chic itself. The curly ribbon doesn't lend itself to the vintage theme but I hope you can overlook that minor detail.  Hee hee!


Here's my recipe:

naked balsa wood box from Michael's dollar bin (I think these were discontinued so you might have trouble finding more of them)

DP from the Que Sera Sera Specialty Paper stack by K and Company

paper flowers from Prima

tiny silk flowers from Michael's bridal section (these are sold in little bunches and I cut them apart to use the individual blossoms)

organza ribbon and gold elastic cord from Michael's

golden plastic gem attached to the wooden button closure (I can't remember where I got it but you can find them almost anywhere)

tiny gold braid trim from Jo-Ann

brads used as centers on the paper flowers by Recollections

blue/violet Crystal Glitter by Mark Enterprises (I don't recall where I bought this either but any crystal type ultra fine glitter will give the same effect.  I used this on the flowers and leaves to give them that pretty sugared appearance.

I really like how it turned out but I would love to know what you think. I'll do my best to begin posting those new cards I promised you last week.  Between the computer crash and my job hunting, there hasn't been time. I have spent the past 2 days interviewing for jobs with agencies and potential employers. I have a phone interview at 11 this morning but if I can get the photos taken and edited, I may even have a second post later today. Thanks so much for stopping by. I hope I have inspired you in some way.

Happy crafting!
Anniebee

Saturday, April 16, 2011

28 Candles Blog Hop


Hello!  Welcome to my blog and the 28 Candles Blog Hop, hosted by the birthday girl herself, the very sweet and talented Kimi! I’m so honored to have been invited to participate in her birthday celebration along with so many other illustrious and creative ladies. This is my first blog hop and I’m very excited for everyone to see what I made in honor of Kimi’s 28th birthday. There’s a hop stop for each year of her age plus one to grow on, making a total of 29 stops!  So grab a snack and something to drink and get ready to see some marvelous, inspiring creations! The hop will remain open for 3 days to give everyone a chance to go all the way through it.  If you arrived here from the ever-so-talented Erin of Spantastikreations, you’re on the right track. If you just stopped by for a visit or if you stumbled upon my blog randomly, you’ll probably want to start at the beginning so that you won’t miss a single thing. I’ll have the full line-up with links to each participating blog at the end of this post so you can always come back here if you get lost on your journey. Now, about my project.

The theme for the entire hop is, of course, things appropriate for a birthday celebration and to honor the birthday girl, I have altered a cute little box and made a matching card to go with it. The box was just a naked wooden box I found in the dollar bin at Michaels a couple of months ago. In fact, I bought the last 2 they had and they were different shapes so you’ll likely see the other one on my blog eventually. If you’ve been following me for a while, you know how much I adore boxes and flowers so this was the perfect project in my estimation!  Kimi’s favorite color is pink.  Therefore, I selected paper with lots of pink in varying shades and a bit of aqua (or pale turquoise if you prefer) to cover the box. It’s from one of my favorite manufacturers, K & Company. I added a strip of beautiful aqua lace across the top and lots of pretty pink and aqua flowers, some looped ribbon, aqua and silver trim and a little bling to finish it off. It’s lined with aqua paper, also from K & Company.  I replaced the brown elastic cord that was used to fasten the flap with some braided gold elastic cording and painted the button closure with gold acrylic paint.  It’s the perfect size to keep an extra pair reading glasses handy on your nightstand, in your craft room or beside your easy chair.  Our Kimi is probably too young to know about such things though <wink>.  Anyway, I want to wish Kimi a very happy birthday! 


I made the card using a leftover scrap of the same paper I used to cover the box but added a couple of other patterns with it for visual interest. The stamped roses are colored with Copics, cut out and popped up on top of the turquoise oval. The paper lace strip was made using a Martha Stewart border punch. Add to the mix a few paper and cloth flowers, a butterfly and an appropriate sentiment and Voila! You have a pretty birthday card! A white paper insert is stamped on the left side with a stained glass-looking design with roses in it that I colored with Copics.  The sentiment on the right side reads “Wishing You a Simply Marvelous Birthday”.  I hope Kimi approves!

Now a hop isn’t a hop without some blog candy, right? I have assembled a little package of fat-free sweet treats for one lucky person. I’m not going to tell you what’s included so it will be a total surprise when the winner opens it! I promise it’s some tasty stuff though. Oh, what fun! I love surprises, don’t you?  The winner will be chosen using Random.org on April 19th. To be eligible to win my goody bag, you’ll need to:  1.) follow my blog, if you’re not already and 2.) leave a comment on this post by 11:59 PM CDT on the 18th telling me what you would wish for if you could be granted one wish for YOUR birthday.  3.) Be sure to include a way for me to contact you in case you win my giveaway. If you omit that important information, I’ll be forced to select an alternate winner and we certainly don't want that!  Also, as much I as love my international followers, I'm afraid that I must limit shipping to the United States and Canada for this giveaway.

Before you hop on to see what the awesome Gaby has in store for you, here’s the list of all the participants with links to each of their blogs, in case you get lost:


I hope you enjoyed your visit and I’d love it if you liked what you saw today enough to come back again.  Now it’s time to hop on over to Gaby’s blog.  Thanks and happy crafting!

Hugs,
Anniebee


Wednesday, April 6, 2011

Wednesday and a Fun Challenge to Stretch Your Creativity...

Hi, everybody!  I'm so sorry not to have posted anything new in the past several days but you'll see in a few minutes why that was.  I have been a busy crafter despite the fact that I didn't show you what I have been working on before now.  This week at Amber's Crafts and Stuff, the designers were tasked with creating projects using a technique we have never used before! Well, even if you have been crafting as long as I have you know that, along with the constant influx of new products and tools, there are always new techniques being devised to create new and different results so that I had a plethora of untried techniques from which to choose.

I know I have said this a few times before but since I have a number of new followers who are most likely unaware, I will tell it one last time.  I lost my job in August of last year after my company was sold and the new owners laid off over half of my department plus 125 other employees throughout the company. That was quite devastating to say the least because I had been with the company almost 15 years and had aspirations of retiring from there in a few years.  Needless to say, I have been searching for a new position since that time and have, as yet, been unsuccessful in that endeavor. They say that every cloud has a silver lining and even though I had to look really hard to discover it, I found that my situation is no exception. Aside from not having to wake up at 6 every morning for the time being, the other good that has come out of this unfortunate situation is that I have learned to make do with less and I have also become more creative in my crafting. Luckily for me (take heed, paper and ribbon hoarders, everywhere!), I had accumulated a little bit of a stash of scrapbooking papers, stickers, ribbons and other goodies before I was let go so I have been able to stay busy with my paper crafting while I have been sitting at home, looking for a job and trying not to use any more gasoline than I absolutely have to. This has resulted in an ever-growing greeting card collection along with a few mini albums and altered, repurposed or recycled projects.

I have also learned some new techniques... how timely, right? LOL! Those who have been following me regularly for a while are aware of my love of flowers and boxes. Well, let me tell you, in case you didn't already know, that living on unemployment with no additional income allows little to nothing in the household budget for crafting supplies! As I stated, I have a decent stash of tools and materials but the way things have been going so far, I decided that I had better learn to stretch that stash as far as I can because it may take quite a while longer to find a new job. Soooo.... I learned to make my own paper flowers! Mostly I have been teaching myself to make roses because I use so many of them and they are one of the most difficult types to make yourself. It took a few tutorials and a lot of practice but I think I have successfully gotten the technique down pat. At least, I think so. That's not to say that my personal technique can't be improved upon or that it won't evolve to some degree going forward but for now, I'm very happy with the way they have been turning out.

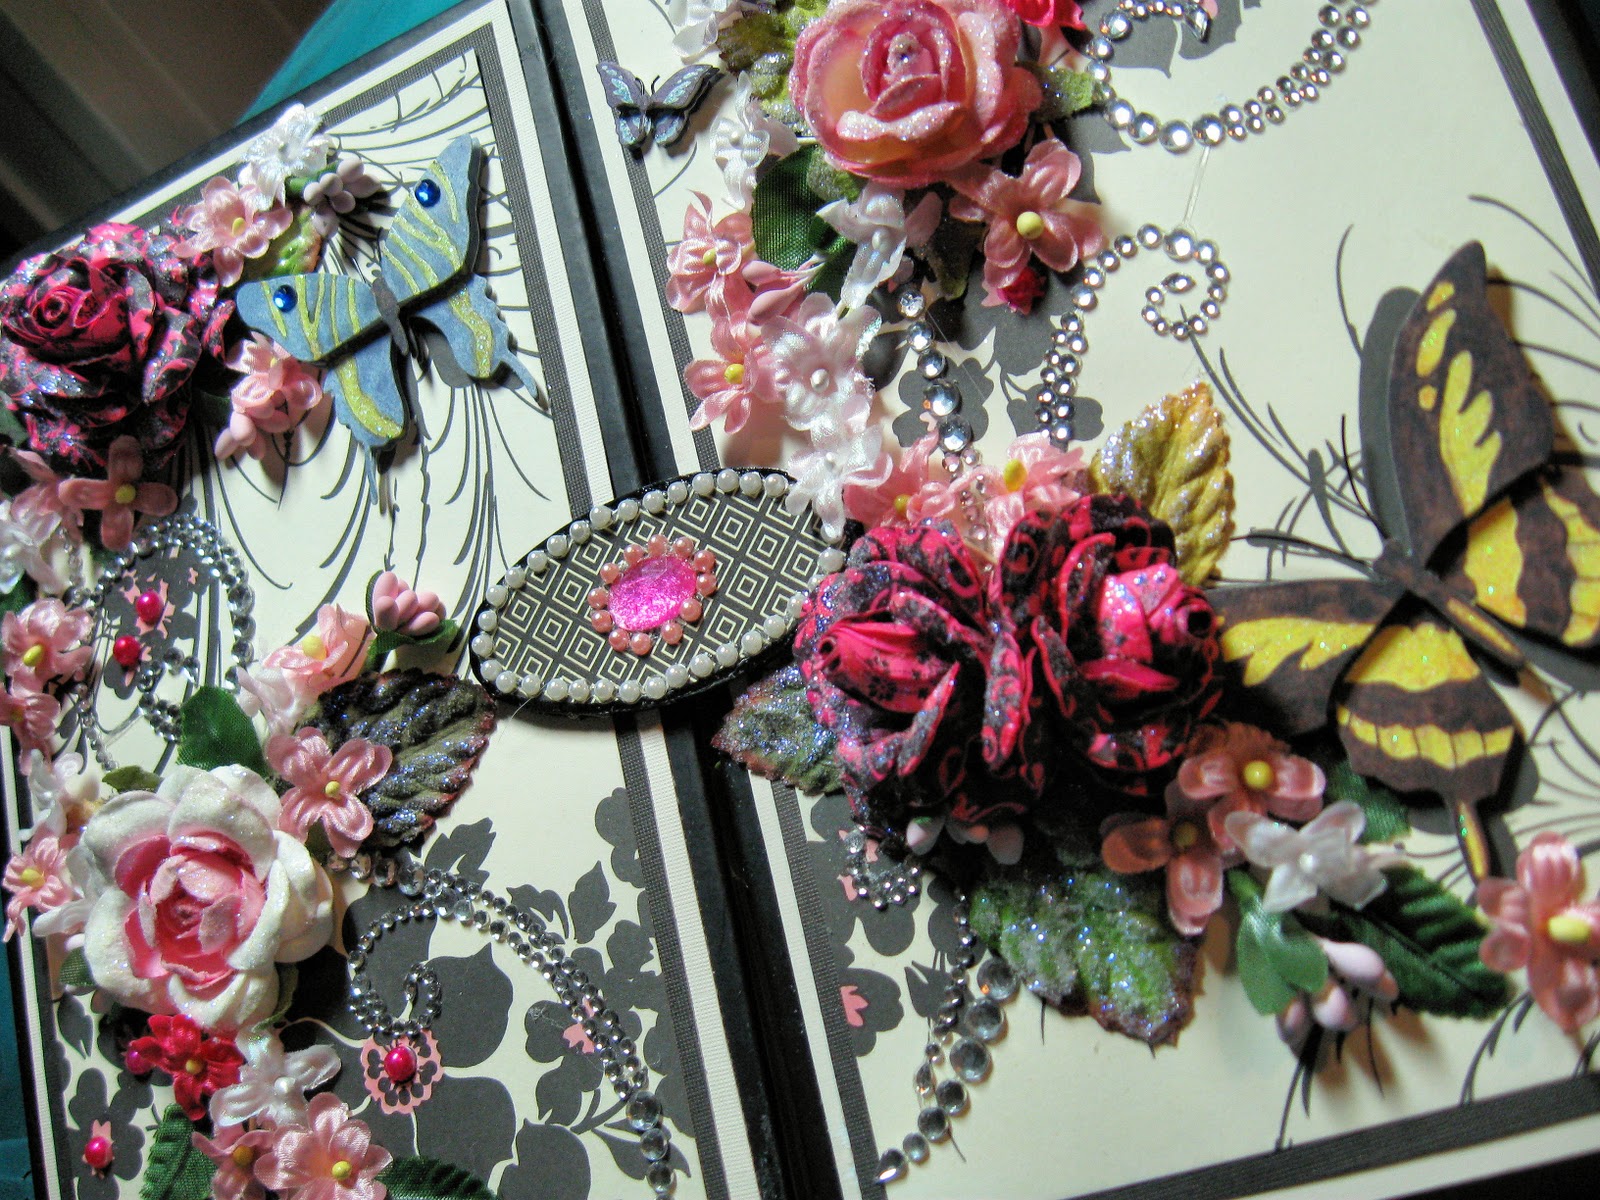
Despite my somewhat futile attempts to de-clutter, I have been hanging on to the most wonderful box for about 3 years, planning to do something spectacular with it but not sure exactly what I wanted to do. This box was received as a Christmas gift from one of my company's outside counsel and originally it contained the most delicious Belgian chocolates from a confectionery named Gudrun. The box measures 10 1/2" x 8" x 2 1/2" and opens on the front in the middle, sort of like a gate-fold card does. It's really cool and I have not seen another one like it since I got it. It also came in its own sturdy gift bag which I also saved and will do something with later.

I completely covered every surface of the box with different scrapbooking papers and cardstock and decorated every side but the back (or bottom in this case) with Copic markers, pearls, flowers, bling and butterflies. I LOVE the way it turned out and now I have not one, but two boxes to hold my greeting card stash. How great is that?! There are several pictures (nothing new there, I know!) so get comfy and grab a beverage of some sort. My hope is that you'll be interested enough to make it through to the end of this lengthy post.

My Butterfly Garden


The dark pink and black roses in the upper left and bottom right corners are the roses I made with my own nimble fingers. The others are some I bought at Michael's.  The next couple of pictures illustrate how the box opens.  The oval-shaped tab in the center has a magnet embedded in it that holds the box closed when both "doors" are shut.  


I couldn't decide whether to line the inside of the box with some pretty pink paper but since it's very clean and in great shape I decided to save my paper for a better use.  I really am becoming quite frugal, aren't I? If you'd known me BU (before unemployment), you'd realize that's not my nature!  Heh heh!


All of the butterflies are by K & Company, from the Susan Winget collection.  The blingy swirls are by Say it with Crystals.


The Recollections pearls, which were originally pale pink, were colored with Copic maker RV 09.  The black and cream DP I used on all sides but the back is from an 8 1/2" square paper pad by K & Company simply called Black and Ivory.  There are some gorgeous patterns in this pad.  After I punched out my flower shapes, I colored the pieces with one of my Copics, RV06.  


This paper I used on the back was a 12" x 12" sheet from a pad of textured cardstock I got at Michael's on clearance for $1.49!  I love the damask diamond pattern on this one.


The box will hold all of the cards I have made right now, which total 13.  It will hold a lot more if they aren't as 3-dimensional as I make most of my cards. 


Here are some of the other roses I made while I was working on my technique.  I used double-sided cardstock for all of the flowers in the next 2 photos.  You can use single-sided paper too if you don't mind the white showing or if you color it with something that won't bleed through to the other side.  


You can see the delicate patterns on the paper if you click on the pictures to enlarge them.  Almost all of the papers I used are from various collections by K & Company.  Que Sera Sera is one of my favorites as the patterns are smaller and more colorful.


The green roses in the bottom left corner are the first ones I made.  Single-sided paper from Basic Grey's Lime Rickey stack was used for these.  The tiny ones were something of a challenge to make when I first started out but became easier as I became more adept.  If you click on the picture, it will enlarge so that you can see the white paper on the inside of the tiny blossoms.  There is one oddball dogwood-type blossom I made with some of the leftover flower shapes.  

I used a combination of techniques but for the most part, I credit one of my favorite blogs, Dana's Inspirations. Dana's You Tube tutorials (you can find a link in the right sidebar of her blog) are entertaining as well as educational and she demonstrates several different types of flower making techniques in her 3-part series. The next technique I want to try is rolled ribbon, felt and tulle flowers. I don't think they take as much time to make and they appear at first glance to be easier to learn. Check out Dana's blog if you get a chance and if you do, let her know I sent you.   

I hope you enjoyed seeing my project. Stop by Amber's blog to see the wonderful projects created by the other design team members. They're sure to inspire you to join in the fun and try a technique you have been wanting to learn. Thanks for visiting me today!

I have entered this project into the following challenges:

Crafts and Me - Glitter
Papertake Weekly - Anything Goes
Colour Create Challenges - Color (Pink, Black and White)
The Paper Shelter - Anything Goes
A Spoonful of Sugar - Tons of Texture
Clear It Out Tuesday - Make a Flower
The Stamping Boutique - Handmade Flowers
The Crazy Challenge - Just Add Flowers
Simon Says Stamp & Show Monday - Anything But A Card
Paper Crafting Journey - For The Ladies


Happy crafting!
Anniebee

Tuesday, March 15, 2011

An Altered Truvia Box

Hi, everybody!  Sorry I have been MIA for a few days.  I had a couple of projects with due dates this week so I had to get them finished.  Between that and looking for a new job, I had little time for blogging.  Soooo... I have a new project that I just finished last week that I want to share with you today.  I always love recycling/ repurposing every day items I have around my house rather than putting them in the recycle bin or the trash can.  I recently discovered a wonderful low calorie sweeetner made from the stevia plant called Truvia.  You have probably seen the commercials for it on tv.  Well, this product only comes in little packets like sugar packets but the packets come packaged in a nifty flip-top box that is perfect for holding 4" x 4" or 4" x 5" cards and envelopes.  I covered the box, inside and out with patterned cardstock and embellished it with lace, ribbon, rub-ons, tiny paper rose buds and some bling.  I used two different patterned papers in the same shades of bluish green.  The paper on the top has white vines, leaves and flowers on it and the paper on the bottom has pink and white flowers and pink lettering.  I rubbed on more pink lettering and some swirly flourishes to add some interest.  The letters are Tim Holtz Grungeboard that I glittered and the hearts are glitter stickers.


I plan to paper the inside of the top but I haven't done that yet.


This design on the top is from a stamp that I stamped in green and then in pink.  I cut out the pink flowers and popped them up on small foam squares.  I added the tiny pink glittered hearts and the pearls in two shades of pink.  I layered the stamped piece on top of some pretty green foil cardstock and popped the whole thing up on pop dots.

Here's what it looks like from the back.  I think I got the soft green ribbon around the bottom edge of the box from the dollar bin at Michael's.  I wish I had bought more of it because I just love it.  The edges are slightly ruffled and it has a tiny narrow ribbon woven down the center of it.  Very fancy stuff!


I hope you like my little box.  Tomorrow my first project for the Crafting Pals Design Team at Amber's Crafts and Stuff is due in preparation of the first weekly challenge hosted by Amber, owner of that blog site.  The challenge will be posted on Wednesday morning and I hope all of my follwers will visit her blog to see what we have created to inspire you and hopefully entice you to participate in the challenge too!  

I have several new projects to share and I hope to post one of them each day this week.  Most of them are cards but I may have another mini later in the week.  Thanks for dropping by.  Have a great week!

Anniebee