Friday, January 27, 2012

An embossed bouquet

TGIF, everybody! Here we are at the end of another week. If the rest of the year goes as quickly as January has, 2013 will be here before we know it! Heaven forbid! It's supposed to be a beautiful weekend though and after the deluge we just had, albeit very much needed, sunshine and warmth is just what this girl needs to give her mojo a little push start.

Today, I want to share with you my first card using WOW Embossing Powders! I have gotten so used to using primarily digital images on my cards, that I had almost forgotten how much fun it can be to design them using simple shapes and colors. That's exactly what I have done here. I used the WOW "Gratitude" stamp set to create this beautiful vase of flowers.


Each flower is stamped with embossing medium onto different colored cardstock and then embossed with contrasting colors of WOW Embossing Powder. I tinted some white flat-back pearls with a Y08 (Acid Yellow) Copic marker to create the flower centers. I embossed a few of the flowers with the stems in WOW Tea Garden Green on light green cardstock. Then Icut some of the other flowers out and glued them on top of the green flowers so that only the stem and leaves would be green.  I also embossed the leafy stem in Earthtone Olive on a dark green background.


I decided what shape I wanted the vase to be and free-handed it on a scrap of medium blue cardstock and used varying shades of darker blue to shade the outside edges to give the illusion that the vase was actually round. I coated the entire piece in Diamond Glaze and sprinkled it with Crystal Glitter.  To enhance the illusion, I used 3 layers of foam tape to raise the center of the vase and glued the outside edges to the corrugated cardboard I used as my background and to which I sponged a little sky blue and silver acrylic paint. I stamped the heart border stamp onto some white cardstock in Tuxedo Black Memento ink and colored the hearts with Copics in colors that coordinated with the flowers and edged the strip with a red Copic.  I also stamped the triple heart motif onto some pink cardstock, embossed it with Cable Car Red WOW powder and then cut them out and coated them with 2 coats of the Diamond Glaze to give them more dimension.


I used metallic black foil cardstock as a mat for the cardboard background and mounted that onto my 5 1/2" kraft base card.  But there's a little surprise that you may have guessed looking at the pictures.  This is actually an easel card!  Here's how it looks when the easel is folded down.


I cut a piece of 5 1/2" square smooth white cardstock to create the writing area inside the card and then matted a 5 1/2" x 2" strip of some coordinating designer paper, mounted it with foam tape to create the area to support the easel and a place to put my sentiment.  The "Thank You so very much" and cute heart stamps are also part of the Gratitude stamp set.  
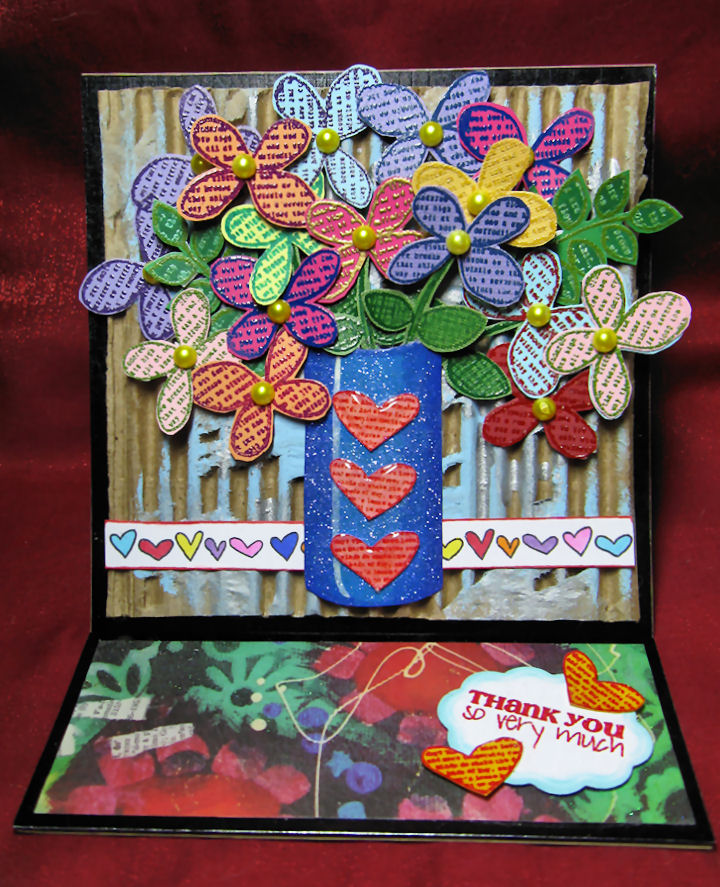

As you can see from my photos, these stamps create crisp, detailed images, perfect for embossing or coloring with markers, colored pencils or other media.  The last little surprise is the definition of the word "Gratitude" that I stamped on the inside of the card as seen below.  When the recipient opens it up to read the giver's personal message, they'll see that definition.  I really love this stamp set, which has 3 additional stamps that I didn't use in the making of my card.


I really like how this colorful little card turned out and I can tell you that I'll be giving my Copics a bit of a rest now and then as more and more stamps are added to the WOW line.  I have seen a sneak peek of some of the ones that will be in the next release and I can tell you they are going to be FABULOUS!!  I want them all and can't wait to get my hands on them!

That's all I have for you today.  Please check out the WOW Blog and Facebook page to see the wonderful projects of my talented teammates.  And iof you're going to CHA, be sure to stop by the WOW booth and see their wonderful work in person.  You will be totally amazed at the versatility of these powders and stamps.  They'll help you take your paper crafting to a whole new level!  So until next time...

WOW Embossing Powder colors used:

Tea Garden Green, Bay Area Blue, Earthtone Olive, Cable Car Red, California Sunshine, Earthtone Paprika, Earthtone Blueberry, Earthtone Grape, Metallic Gold Rich Pale Regular.

Happy crafting!
Anniebee


I am entering this card in the following challenges:

TBD

Wednesday, January 25, 2012

Button It Up! Final Joy's Life Design Team project

As mentioned in my previous post, today will be my last post for Joy's Life Design Team and for this post I made a card using the ever-popular pirate theme.  Joy's fabulous You're So Punny stamp set was used for the greeting on the front of the card as well as the sentiment on the inside.  I have been planning to make this card for some time but somehow the theme never seemed to be appropriate until now.  We were asked to create something using buttons. I had this really cool-looking rectangular button that originally had a metallic copper finish and I coated it in WOW! Metallic Gold Pale Regular embossing powder and heated it with my heat gun.  It gave the button an entirely new look and it coordinated better with the cold accents I used on the card.

 This swashbuckler is straight from the imagination of Phee McFaddell, one of my favorite illustrators.


I'd like to thank Joy for her generosity and for giving me the opportunity to represent her stamp company during this fun and fantastic time that I have been a member of this very talented group of designers and our dedicated group leaders as well.  If you still haven't tried Joy's stamps, I don't know what you're waiting for!  You'll love 'em!

Please check back on Friday for my third project for the WOW! Embossing Powder Design Team and in the meantime, you might want to check out the WOW blog and facebook page.  There is a new project posted every day of every month on the blog.

Until next time...

Happy crafting!
Anniebee

Last project for Blog Quick Quotes

Hi, everybody!  It's hump day and also the day of my last post as guest designer for Blog Quick Quotes.  For this post I created another layout featuring a photo of my pretty niece, Kirsten.  The Julie Je T'aime papers by Quick Quotes created the perfect backdrop for this photo.  This line is my favorite of all of the Quick Quotes paper lines and the colors coordinate so well with the photo.


The beautiful flowers are from Petaloo and the butterfly and dragonfly die cuts are by K & Company. I'd like to thank the folks at Quick Quotes for having me as their guest this month and I wish them continued success in 2012.  Stay tuned for my last post for the Joy's Life Design team, which will be posted shortly.  Be back in a few...

Anniebee

Monday, January 23, 2012

Time Flies!


Hello, crafty friends! I can't believe it's Monday again already and not only that, it is also nearing the end of January already! Can you believe it's almost the "month of love"??? I sure can't!  I'm as pleased as punch to present to you my first layout using WOW! Embossing Powders and Stamps. If you have never used embossing powders, let me tell you that they add an extra special element to your designs and are more versatile than most people know. Of course, if you have been following this blog, you have likely discovered this fact already.
I used a diamond stencil template to create a background for my layout using black ink and WOW Clear Gloss Regular Embossing Powder. The first thing I did was to tape the template to the edges of the patterned paper I was using. I could have used Ebony embossing powder but I wanted the pattern to fade into the existing pattern on the right side of the paper so I needed to control the intensity of the color as I applied it.  I accomplished this by using a large sponge dauber to apply my ink and when I got to the center of the page, I didn't refresh the ink so that it faded out the farther to the right I went.


Next I took an older embossing ink pad that I didn't care if I ruined and applied it over the black I had just stenciled. I carefully removed the stencil template and applied the clear embossing powder, then melted it with my heat gun. Then I taped a clock template to the paper and with a sponge dauber and white and red acrylic paint, I stenciled parts of the clock pattern on top of the diamond pattern. After the paint dried completely, I used a black Copic multiliner to enhance the numbers on the clocks as well as the numbers randomly located around the page. I also sponged a little red paint on a couple of areas and used a brayer to smooth it out.


Once my background was finished, I laid the photo of my beautiful niece I was using and all the embellishments on top of it and rearranged them until I liked the way it looked. I also embossed a couple of leaves with some of the WOW Metallic Gold Rich Pale Regular powder and arranged them in with the flowers. I made the letter tiles out of some cork squares that I got from a glass shop. They were once used to separate the pieces of glass to keep them from bumping each other and breaking on the rack. I just love recycling/reusing ordinary things and incorporating them into my art!  If you look closely, you'll also see a tear strip from a FedEx box that I stripped the paper off of to reveal the corrugated interior and splashed a little red paint on it.


The finishing touch was the cute pocket watch I added.  It's actually a resin dimensional sticker by Jolee's and I found some angel wings in clip art form, printed them and colored them with my Copics. I then cut them out and adhered them to the back side of the pocket watch.  I folded some foam mounting tape about 4 times to create a wedge shape to securely support it and to elevate it above the surface of the page. This layout was so much fun to make and I can't say enough about Wow Embossing Powders.  You owe it to yourself to try one or two of the gorgeous colors it comes in.  I think you'll love them as much as we do!


So there you have it. I hope you'll visit the WOW blog and if you like what you see there, I invite you to become a follower so you can keep up with what all the mega-talented designers are doing. If you happen to be attending CHA, stop by the WOW! booth and say hello to Suzy West and the Design Team.  I wasn't able to attend this time. :o(  Thanks for stopping by today. I hope your week is off to a good start and that you'll find some creative time to do something fun this week.

Happy crafting!
Anne

Saturday, January 21, 2012

Heritage Layout for Blog Quick Quotes

Hello again, my crafty friends! It's time for another project for Blog Quick Quotes and this time I have chosen the Quick Quotes Just Jackson line for the heritage page I made to honor my father, whom I lost to Alzheimer's Disease in May of 2003, two years to the month after my mother passed away. He served in the U.S. Army during World War II and was deployed to far away places like China and India. He told us, his children, many stories of those days and taught us to count to 10 in Chinese. I think that was pretty much the extent of his foreign language skills.


My dad was proud of all of his children and worked hard as a third shift postal supervisor to provide for his family, allowing my mom to stay home and care for us.  He taught me to swim, to ride a bicycle, to roller skate and to defend myself. He coached my softball team and my younger brother's baseball team. He was a bit on the stubborn side and saw most issues in black and white but he was kind, understanding and he always put his wife and family above himself.

This little layout is to honor him and the man that he was. Please visit the Quick Quotes blog to learn more about how I created this layout as well as the supplies I used. I hope you'll join me again on Monday for a layout I made for WOW! Embossing Powders and I'll post my last project for Blog Quick Quotes on Wednesday, the 25th. This month has flown by so fast it's hard to believe that my time as QQ guest designer is drawing to an end already! I have thoroughly enjoyed every minute of working with their incredibly talented design team and their fabulous products. Thanks for stopping by. Until next time...

Happy crafting!
Anniebee

Friday, January 20, 2012

My first project for WOW!

Hi, everybody! Well, I didn't have a chance to post the extra projects I mentioned but I'm hoping that this one will make up for my very brief absence. I am finally ready to reveal my first design team project for WOW! Embossing Powders!!! I have been so excited about this new company and I am both honored and humbled to have been selected as a member of their first U.S. design team. You won't believe the talent of the other members of this international team.

I have always loved using embossing powders to add dimension and interest to my greeting cards but there are soooo many other ways to use them and Suzy West, the U.S. Marketing Director for Wow has developed her own line of absolutely delicious colors making them even more fun and adding even more creativity to your paper crafting! You really should try them.

For my first project, I wanted to do something completely different than anything I had seen being done by my teammates and other crafters around the web. I found a really pretty square acrylic plate charger at Hobby Lobby and thought it would make an interesting base for creating a 3D altered art project. I liked the fact that it wasn't the typical round shape like most of them are.


First I cut a piece of scrapbook paper to the size that would fit perfectly in the depressed area intended for the bottom of the plate and rounded the corners with my Corner Chomper. The paper is from an 8" DCWV stack called The Colorful Life, which was designed by Donna Estabrooks. All the pages in this little stack are very colorful and very artsy-fartsy, as I like to say. I'll be making another project with these papers that should be ready to post in a couple of weeks so stay tuned for that.


Next, I took the beautiful little fairy, which is a digital image created by none other than Phee McFaddell, colored her with my Copic markers in colors that would coordinate well with the background and cut her out. I stamped the butterfly outline from WOW's Build a Butterfly stamp set in Top Boss embossing medium onto white vellum paper and again on white cardstock in black Memento ink. I used WOW Earthtone Grape Regular embossing powder on the vellum and after heat setting it, I colored both layers with my Copics and cut them out. I mounted the vellum layer on top and added purple flat-back pearls for thebutterfies' bodies.


Then I added a rhinestone flourish in pale pink on the background and started arranging the flowers, most of which are from Petaloo, the way I wanted them before I began to adhere them to the surface. I made the turquoise rose from organza ribbon and glued a half-back pearl in its center. After affixing all the flowers, I placed the butterflies where I wanted them and Voila! I had made a sort of framed diorama that can be hung on the wall or displayed on a plate easel.

Be sure and stop by the WOW blog and see what my very talented teammates have created to inspire you to try this wonderful new line of embossing powders and stamps for yourself.  Monday is my day to post on the Wow blog and I'll have a cool layout to show you so if you love to scrap, you'll definitely want to check it out.

Thanks for visiting today. I hope you enjoyed seeing this little project as much as I enjoyed making it. As always, your comments are encouraged and appreciated.  And don't forget to ask your local scrapbooking store to stock WOW! products!

Until next time....
Anniebee

Monday, January 16, 2012

First layout for Blog Quick Quotes

Hello, all!

It's Monday again already and I wasn't at all ready for it to get here so soon but get here, it did and I am always determined to make the best of each and every day... especially Mondays!  Today, I have the first layout I created as guest designer for Blog Quick Quotes.  I used their wonderful Damsel in Distress papers, which feature Monarch butterflies and shades of grey, black and cream.  I chose to color the butterflies with Copics to add just a touch of additional color.

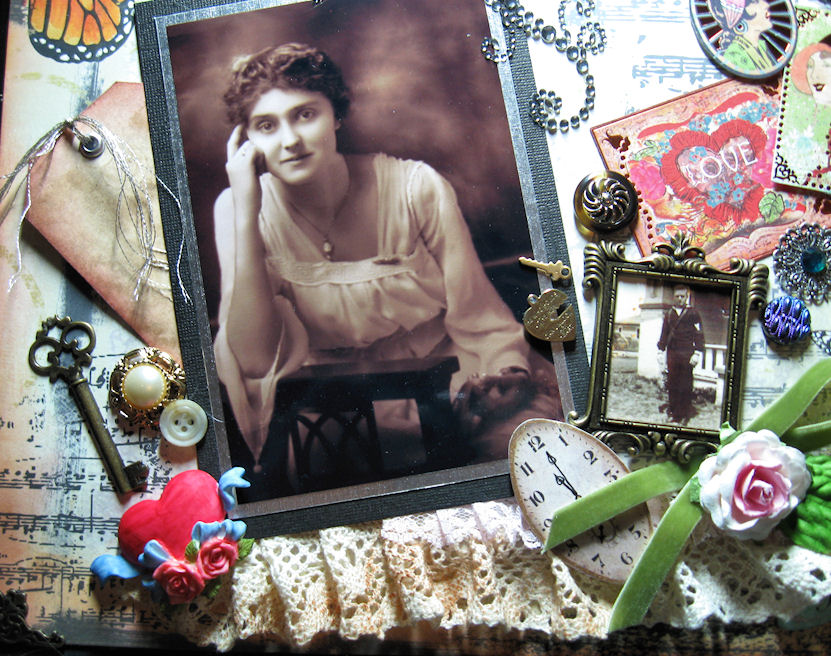
I have been wanting to do some family heritage pages, using some very old photographs that my sister scanned so all of us could have copies of them.  The photo on this layout is one of my great aunts who was a young woman around the turn of the 20th century.  I have always loved this picture as it gives off a feeling of quiet sophistication.


I used bits and pieces of modern reproductions of antique items you might have seen in the sewing room of that period...  a piece of crocheted lace, some old buttons and a small bit of velvet ribbon, as well as a Valentine's Day card, an old key, a photograph of a fiance and a resin heart that I hand painted with Copics.  


There are a few closeups showing the details.  I'm hoping that if my Aunt Rena is looking down from heaven, she likes this little tribute to her.  I hope you'll take a few minutes to visit Blog Quick Quotes and see the sneak peeks of the new paper lines they will introduce at CHA in a couple of weeks.  Thanks so much for visiting me today.  I'll be back on the 21st with another project for Quick Quotes and in the meantime, I'll be featuring my first projects for my new design team for WOW! Embossing Powders.  I'll try to have some additional new stuff in between.  Until next time...

Happy crafting!
Anniebee